#array php add item
Explore tagged Tumblr posts
Visit Tumblr Blog
Explore Tumblr blogs with no restrictions, modern design and the best experience.
Last Seen Tumblr Blogs


Fun Fact
Post activity is at the highest at 4:00 pm EDT; notes peak at 10:00 pm EDT.
Text
Building Your First WordPress Plugin: A Step-by-Step Guide
Want to extend WordPress's functionality? Creating a plugin is your answer. Let's break down the process into simple steps.
1. Plan Your Plugin
Define the purpose: What problem does your plugin solve?
Identify core features: What functionalities will it offer?
Choose a name: Pick a descriptive and unique name.
2. Set Up the Structure
Create a new folder: In your wp-content/plugins directory, create a folder with your plugin's name.
Create the main file: Inside this folder, create a PHP file with the same name as the folder.
3. Add Plugin Header
Essential information: At the top of your PHP file, add a header comment with details like plugin name, description, author, and version. This is crucial for WordPress to recognize your plugin.
4. Write Your Code
Basic functionality: Start with simple functions. For example, you could create a custom shortcode or add a new menu item to the admin panel.
Leverage WordPress actions and filters: To integrate seamlessly with WordPress, use hooks like add_action and add_filter.
Test thoroughly: Use a staging site to test your plugin before activating it on a live site.
5. Activate and Test
Activate: Go to the "Plugins" section in your WordPress admin dashboard and activate your plugin.
Test features: Ensure everything works as expected.
Debug and refine: If you encounter issues, use debugging tools to identify and fix problems.
Additional Tips
Use clear and concise code: Write clean code for better maintainability.
Document your code: Add comments to explain your code's logic.
Consider security: Protect your plugin from vulnerabilities.
Leverage WordPress APIs: Explore the vast array of functions and classes available.
Remember: Building a plugin takes time and practice. Start small, iterate, and learn from your experiences. With dedication, you can create valuable tools for the WordPress community. Embarking on WordPress plugin development is a rewarding journey that allows you to contribute to the world's most popular CMS.
0 notes
Text
This Week in Rust 457
Hello and welcome to another issue of This Week in Rust! Rust is a programming language empowering everyone to build reliable and efficient software. This is a weekly summary of its progress and community. Want something mentioned? Tweet us at @ThisWeekInRust or send us a pull request. Want to get involved? We love contributions.
This Week in Rust is openly developed on GitHub. If you find any errors in this week's issue, please submit a PR.
Updates from Rust Community
Project/Tooling Updates
rust-analyzer changelog #143
Slint UI crate weekly updates
This week in Databend #56: A Modern Cloud Data Warehouse for Everyone
What's new in axum 0.6.0-rc.1
HexoSynth Modular Synthesizer in Rust - Devlog #10: Alpha-1 Release
Fornjot (code-first CAD in Rust) - Weekly Release - 2022-W34
Observations/Thoughts
Come contribute to Salsa 2022!
State Machines II
Rust Walkthroughs
Tauri + Async Rust Process
Writing a container in Rust
Experimentally compiling PHP code to Rust - Ryan Chandler
STM32F4 Embedded Rust at the HAL: GPIO Interrupts
[video] Rust Traits vs C++ Concepts
[video] Writing Procedural Macros
[video] Get under the hood of Rust Language with Assembly!!
[video] Scoped threads in Rust 1.63
[video] 1Password Developer Fireside Chat: Demystifying Atomics
Crate of the Week
This week's crate is sass-embedded, a library to communicate with Embedded Dart Sass.
Thanks to Ahab for the self-suggestion.
Please submit your suggestions and votes for next week!
Call for Participation
Always wanted to contribute to open-source projects but didn't know where to start? Every week we highlight some tasks from the Rust community for you to pick and get started!
Some of these tasks may also have mentors available, visit the task page for more information.
Ockam - Add syntax highlighting to examples in ockam clap command help using syntect
Ockam - Add examples section to ockam tcp-inlet create command's help
Ockam - Make ockam node delete --all --force command more forceful
Mirrord - Consider using mold linker
Mirrord - mirrod-layer and mirrord bin are being built twice when running cargo +nightly build
If you are a Rust project owner and are looking for contributors, please submit tasks here.
Updates from the Rust Project
411 pull requests were merged in the last week
mitigate stale data reads on SGX platform
support 128-bit atomics on all aarch64 targets
rustc_metadata: deduplicate strings to prevent multiple copies in rmeta/query cache blow file size
make NOP dyn casts not require anything about the vtable
implied bounds: explicitly state which types are assumed to be wf
never consider unsafe blocks unused if they would be required with deny(unsafe_op_in_unsafe_fn)
do not allow Drop impl on foreign fundamental types
don't derive PartialEq::ne
lazily decode SourceFile from metadata
make must_not_suspend lint see through references when drop tracking is enabled
mention as_mut alongside as_ref in borrowck error message
point at a type parameter shadowing another type
recover keywords in trait bounds
reenable disabled early syntax gates as future-incompatibility lints
improved diagnostic for function defined with def, fun, func, or function instead of fn
suggest fn if fun, func, function or def is used to define a function
suggest once_cell::Lazy for non-const statics
suggest adding a reference to a trait assoc item
suggest adding an array length if possible
suggest the right help message for as_ref
UnreachableProp: preserve unreachable branches for multiple targets
kind-less SessionDiagnostic derive
convert diagnostics in parser/expr to SessionDiagnostic
migrate "invalid variable declaration" errors to SessionDiagnostic
migrate emoji identifier diagnostics to SessionDiagnostic in rustc_interface
migrate lint reports in typeck::check_unused to LintDiagnostic
migrate more rustc_borrowck diagnostics to SessionDiagnostic
migrate rustc_ast_passes diagnostics to SessionDiagnostic and translatable messages (first part)
migrate typeck's used expected symbol diagnostic to SessionDiagnostic
migrations for rustc_expand transcribe.rs
migrate some rustc_borrowck diagnostic
miri: breaking posix_memalign precondition is not UB
miri: improve information sharing across SB diagnostics
miri: add very basic Android support
remove manual implementations of HashStable for hir::Expr and hir::Ty
shrink ast::Attribute
box the MacCall in various types
use AttrVec more
add IpDisplayBuffer helper struct
rework Ipv6Addr::is_global to check for global reachability rather than global scope
make slice::reverse const
refactor iteration logic in the Flatten and FlatMap iterators
futures: fix incorrect termination of select_with_strategy streams
cargo: fix file locking being not supported on Android raising an error
cargo: improve error message for an array value in the manifest
cargo: improve error message for wrong target names
rustdoc: merge source code pages HTML elements together v2
rustdoc: count deref and non-deref as same set of used methods
rustdoc: strategic boxing to reduce the size of ItemKind and Type
rustfmt: Unicode comment align
clippy: add unused_peekable lint
clippy: add manual_empty_string_creations lint
clippy: add new lint positional_named_format_parameters
clippy: don't lint on match pattern-binding in question_mark
clippy: enhance needless_borrow to consider trait implementations
clippy: fix non_ascii_literal in tests
clippy: fix to_string_in_format_args false positive
clippy: fix false positives of needless_match
clippy: lint collapsible_str_replace
clippy: more lint pass merges
clippy: refactor FormatArgsExpn
clippy: rework only_used_in_recursion and move it back to complexity
clippy: transmute_undefined_repr fix
clippy: check for if-some-or-ok-else-none-or-err
clippy: Do not lint needless_collect if the target code is inside a loop
clippy: suggest map_or in case_sensitive_file_extension_comparisons
clippy: unwrap_used and expect_used: trigger on uses of their _err variants
rust-analyzer: consider bounds on inherent impl in method resolution
rust-analyzer: implement IntoFuture type inference
rust-analyzer: implement lsp extension for cancelling running flychecks
rust-analyzer: log rustfmt parsing errors as warnings
rust-analyzer: pop an error notification when flycheck can't be restarted
rust-analyzer: add a setting for keyword hover popups
rust-analyzer: add an assist for inlining all type alias uses
rust-analyzer: generate static method using Self::assoc() syntax
rust-analyzer: improved inline_call to replace Self
rust-analyzer: run test mod from anywhere in parent file
rust-analyzer: make trait assoc items become inactive due to cfg
rust-analyzer: fix panics on GATs involving const generics
rust-analyzer: escape keywords used as names in earlier editions
rust-analyzer: record completion filtering
rust-analyzer: resolve associated types of bare dyn types
rust-analyzer: resolve path Self alone in value namespace
tidy: check fluent files for style
Rust Compiler Performance Triage
Overall some really impressive wins this week. Note in particular PR #100209, "Lazily decode SourceFile from metadata" (which improved 75 primary benchmark scenarios and 158 secondary scenarios) and PR #98655 "Don't derive PartialEq::ne", which improved 65 primary scenarios and 27 secondary scenarios). There were a few cases that pnkfelix explicitly decided not to mark as triaged; see report for more details there. Also pnkfelix wonders if there is a recent slight-upward trend on max-rss for the past week, see the summary graph
Triage done by @pnkfelix. Revision range: 14a459bf..4a24f08b
Summary:
(instructions:u) mean range count Regressions ❌ (primary) 0.6% [0.4%, 0.8%] 27 Regressions ❌ (secondary) 0.4% [0.2%, 0.6%] 9 Improvements ✅ (primary) -1.7% [-20.1%, -0.3%] 91 Improvements ✅ (secondary) -3.6% [-18.7%, -0.3%] 160 All ❌✅ (primary) -1.2% [-20.1%, 0.8%] 118
3 Regressions, 4 Improvements, 4 Mixed; 3 of them in rollups 43 artifact comparisons made in total
Full report
Call for Testing
An important step for RFC implementation is for people to experiment with the implementation and give feedback, especially before stabilization. The following RFCs would benefit from user testing before moving forward:
No RFCs issued a call for testing this week.
If you are a feature implementer and would like your RFC to appear on the above list, add the new call-for-testing label to your RFC along with a comment providing testing instructions and/or guidance on which aspect(s) of the feature need testing.
Approved RFCs
Changes to Rust follow the Rust RFC (request for comments) process. These are the RFCs that were approved for implementation this week:
No RFCs were approved this week.
Final Comment Period
Every week, the team announces the 'final comment period' for RFCs and key PRs which are reaching a decision. Express your opinions now.
RFCs
No RFCs entered Final Comment Period this week.
Tracking Issues & PRs
[disposition: merge] Register wf obligation before normalizing in wfcheck
[disposition: merge] Partially stabilize bound_as_ref by stabilizing Bound::as_ref
[disposition: merge] Document NonZeroXxx layout guarantees
[disposition: merge] Strengthen invalid_value lint to forbid uninit primitives, adjust docs to say that's UB
[disposition: merge] Make forward compatibility lint deprecated_cfg_attr_crate_type_name deny by default
New and Updated RFCs
[new] RFC: Statics in patterns
Upcoming Events
Rusty Events between 2022-08-24 - 2022-09-21 🦀
Virtual
2022-08-24 | Virtual (Beijing, CN) | WebAssembly and Rust Meetup (Rustlang)
Tech Talk Live Appointment: Customize GitHub Workflow with Serverless Functions - How to use Rust and JavaScript to automate GitHub processes
2022-08-24 | Virtual + Wellington, NZ | Rust Wellington
Flywheel Edition: 3 talks on Rust!
2022-08-25 | Virtual (Karlsruhe, DE) | The Karlsruhe Functional Programmers Meetup Group
Stammtisch: together with the C++ UG KA; various topics, from C++ to Rust
2022-08-27 | Virtual (Bangalore, IN) | Polkadot India
Substrate Saturday - Bootcamp Series 2: Fundamentals of Rust & Substrate
2022-08-30 | Virtual (Berlin, DE) | OpenTechSchool Berlin
Rust Hack and Learn
2022-08-30 | Virtual + Dallas, TX, US | Dallas Rust
Last Tuesday
2022-09-01 | Virtual (PDT Timezone) | Conf42
Conf42: Rustlang 2022
2022-09-01 | Virtual | Google Open Source Live
Rust Day on Google Open Source Live
2022-09-02 | Virtual (Nürnberg, DE) | Rust Nuremberg
Rust Nuremberg Get Together
2022-09-03 | Virtual (Bangalore, IN) | Polkadot India
Substrate Saturday - Bootcamp Series 2: Fundamentals of Rust & Substrate
2022-09-03 | Virtual (Nürnberg, DE) | Rust Nuremberg
Deep Dive Session 1: Tokio my-redis Tutorial
2022-09-04 | Virtual (Seattle, WA, US) | Seattle Rust Meetup
September Meetup
2022-09-06 | Virtual (Beijing, CN) | WebAssembly and Rust Meetup (Rustlang)
Monthly WasmEdge Community Meeting, a CNCF sandbox WebAssembly runtime
2022-09-06 | Virtual (Buffalo, NY, US) | Buffalo Rust Meetup
Buffalo Rust User Group, First Tuesdays
2022-09-07 | Virtual (Indianapolis, IN, US) | Indy Rust
Indy.rs - with Social Distancing
2022-09-10 | Virtual | Rust GameDev
Rust GameDev Monthly Meetup
2022-09-10 | Virtual (Bangalore, IN) | Polkadot India
Substrate Saturday - Bootcamp Series 2: Fundamentals of Rust & Substrate
2022-09-12 | Virtual + Dublin, IE | Linux Plumbers Conference
Rust Microconference in LPC 2022
2022-09-13 | Virtual + Dallas, TX, US | Dallas Rust
Second Tuesday
2022-09-13 | Virtual (Rostock, DE) | Altow Academy
Rust Meetup Rostock
2022-09-14 | Virtual (Malaysia)| Golang Malaysia
Rust Meetup September 2022
2022-09-15 | Virtual (Columbus, OH, US) | GDG Columbus
Past, Present, and Future of Internet Money! (Custom tokenomics, RUST and CosmWASM library...)
2022-09-20 | Virtual (Washington, DC, US) | Rust DC
Mid-month Rustful
2022-09-21 | Virtual (Vancouver, BC, CA) | Vancouver Rust
Rust Study/Hack/Hang-out (Call for Participation)
Europe
2022-08-25 | Copenhagen, DK | Copenhagen Rust group
CPH Hack Night #28
2022-08-25 | Stockholm, SE | StockholmCpp
0x21: Learning from Rust, Typical C++
2022-08-30 | Utrecht, NL | Rust Nederland
Run Rust Anywhere
2022-09-12 | Dublin, IE + Virtual | Linux Plumbers Conference
Rust Microconference in LPC 2022
North America
2022-08-23 | Toronto, ON, CA | Rust Toronto
WebAssembly plugins in Rust
2022-08-25 | Ciudad de México, MX | Rust MX
Concurrencia & paralelismo con Rust
2022-08-25 | Lehi, UT, US | Utah Rust
Using Github Actions to Deploy Cargo Crates with Jordan and Food!
2022-08-31 | New York, NY, US | Rust NYC
August Meetup: Rewriting a high performance Vector Database in Rust.
Oceania
2022-08-24 | Wellington, NZ + Virtual | Rust Wellington
Flywheel Edition: 3 talks on Rust!
2022-08-26 | Melbourne, VIC, AU | Rust Melbourne
August 2022 Meetup
If you are running a Rust event please add it to the calendar to get it mentioned here. Please remember to add a link to the event too. Email the Rust Community Team for access.
Jobs
Please see the latest Who's Hiring thread on r/rust
Quote of the Week
A fast executing language that crashes all the time is like a supercar… that crashes all the time.
– Tris on youtube
Thanks to scottmcm for the suggestion!
Please submit quotes and vote for next week!
This Week in Rust is edited by: nellshamrell, llogiq, cdmistman, ericseppanen, extrawurst, andrewpollack, U007D, kolharsam, joelmarcey, mariannegoldin.
Email list hosting is sponsored by The Rust Foundation
Discuss on r/rust
0 notes
Text
From the archives: A roundup of old “Did you read” blog posts
I've gone back and gathered links to old Chicago Reader “Did You Read __________?” blog posts that I contributed items to from 2012 to 2016. These posts were all “authored” by “Reader staff” with attibution to the individual contributors appearing in the body text next to their contributed items. So like some other things with the top-level byline done in this way, they don't appear on individual contributors’ author archives pages.
I got the post URLs using Google Search and then wrote a PHP script pulling all the URLs from the Search results into an array and fetching each post’s headline, subheadline, and publication date, sorting it all in reverse chronological order, and then outputting a useful list of links in nice HTML for presentation on the web. It’s probably most but not all of these posts that I contributed to.
(Among possibly other things, this let me add these to my Muckrack portfolio.)
“Did You Read __________?” [snapshot in the Wayback Machine at archive.org] was a topic series—you can think of it simply as a blog—that started in January 2012 in The Bleader blog (previously “The Blog,” sort of a single-company blog network or parent blog under which individual blogs or sub-blogs existed) on chicagoreader.com that ran initially as a more-or-less daily place for Reader staff to share interesting things, usually articles, from elsewhere on the web, sort of quick-hit link sharing. It shared links to “stories that fascinate, alarm, amuse, or inspire us.”
It was the successor to “What the Reader’s Reading” [Wayback Machine snapshot], a regularly updated feed of links from early 2010 to late 2011 powered by a news-aggregation platform called Publish2 that the Creative Loafing folks were especially excited about but did actually do some cool microblogging things including tagging and categorizing content and, if I recall, also had some rudimentary social media-type features built in. Links shared this way were presented in various places on the site, especially on the Reader homepage and on section-specific posts (e.g. music-tagged links [Wayback Machine] on music posts) and on section table of contents [Wayback Machine] pages.
Later, the idea of daily “Did you read” posts as compilations of staff contributions was dropped and freelancer Kate Shepherd wrote all the posts for the rest of the series from January 2016 until it was discontinued after Valentine’s Day in February 2018—at a particularly tumultuous time in the Reader’s history.
#Chicago Reader#blogs#news aggregation#Creative Loafing#websites#John Dunlevy#Kate Shepherd#Wayback Machine#Publish2#microblogging#Muckrack#2010#2011#2012#2016#2018#Google Search#PHP#links
0 notes
Text
Array no PHP Criando e iterando
Array no PHP Criando e iterando
Array no PHP Criando e iterando
Array no PHP é uma estrutura que relaciona valores e chaves, é uma lista de valores armazenados na memória.
Um array em PHP é equivalente ao conceito de vetor normalmente ensinado nas faculdades. Outro conceito que se asemelha é o conceito de matriz, equivale a um array multidimensional (um array composto de outros array’s). (more…)
View On WordPress
#array#array php#array php 7#array php a xml#array php add first#array php add item#array php ajax#array php foreach#array php functions#array php insert#array php to javascript#array_push php#PHP#programação
0 notes
Text
Magento Vs OsCommerce Comparison for Online Store Owners

Magento and osCommerce both allows store owners to maintain their online stores with minimum effort. Magento & osCommerce are eCommerce open-source shopping cart applications and both are packed with all the features needed to create a successful web store. We have composed this article to help you to know the advantages and disadvantages of each platform. So checkout the comparison of these two eCommerce applications to see which one is better for your online stores, because it is important to know when selecting your shopping cart what features you need.
osCommerce is a free open source online store-management software which is powered by very well established and responsive osCommerce community. To run any osCommerce website the web server should support the powerful PHP web scripting language and fast MySQL database. osCommerce offers a wide range of features that allows online stores to be setup fairly quickly with ease.
Magento is a highly efficient open source eCommerce platform. It offers you an extensive suite of powerful tools for creating and managing an online store. Magento runs on the Apache/MySQL/PHP platform and to create an online store with it you need reliable web hosting services. Support for Magento shopping cart is provided free by an active open source community, professional support by subscription to Varien, the company behind Magento, is cost charging. The large array of the rich features is one of the main benefits of Magento. Magento comes with enterprise-level features and quality of build. It lets you control every facet of your store, from merchandising to promotions, and there are no limits to creativity with Magento which allows us to create stunningly beautiful eCommerce themes for Magento that will improve your brand's visibility adding trust to your e-business and improving sales with SEO effort put into developing them.
Advantages and disadvantages of Magento over osCommerce: • Magento needs dedicated servers from particular hosting providers in order to run fast shops while shared web hosting account will be enough for osCommerce.
• Magento has many add-on modules within the rest of new and important capabilities. The feature set for Magento includes not only all of the features of osCommerce, but also many of the add-on modules. For instance, it includes coupons, order editing, SEO urls and meta tags, abandoned shopping cart reporting, product comparisons, editable order emails, shipping estimator in shopping cart without the need to login, and much more.
• Magento shopping cart is built to be easy to update.
• Magento runs fairly slow, heavily layered and overly complicated coding style and thousands of files requires a lot of time to learn and do customizations.
• Magento offers well organized backend along with cleaner site structure. Its backend is well organized and most items of concern are thoroughly covered. Talking about osCommerce, some people admit that its code is a real mess and the back-end is really pitiful.
• Magento is a new solution which is regularly improved. Web developers and store owners look forward the new releases of Magento. OsCommerce is rather old and it doesn't surprise its owners with new updates.
1 note
·
View note
Text
{{Don't|Do Not}|Do Not{} {Just|Simply|{ That Is}} Sit There! {Start|Begin} BigCommerce

If you are an designer that is amateur always shy way through the thought of designing your own custom products. Then, you have to understand that there are numerous easy-to-use rich internet product design tool exists available to you that can help you because of the designing of customized products. Interestingly, these web applications can be simply executed on the Internet without leaving the comfort that is total of personal computers. The product that is online tools have come a long way from the traditional desktop web apps such as for example Photoshop, Adobe Illustrator and Corel Draw. The custom online product design software are rich internet applications which can be easily incorporated into any websites that are e-commerce by Magento, osCommerce, Shopify, BigCommerce, X-Cart and other shopping cart platforms. These kind of web applications are coded with different technologies that are advanced as PHP, jQuery, Adobe Flex/ Flash and a browser supported language. One of the more important features of using these online designer tool is that there is you should not install such tools unlike the desktop web apps. Associated with simple - they run using a web server. A wide array of online product designer tool is available on the net which act as a custom web based rich applications for the users to produce customized products. With one of these custom design tools, it's possible to deal with your whole designing procedure of custom products ranging from t-shirts to apparels, shoes, banners, shoes, signages, designer skins for laptop, iPads, iPhones or iPods, vinyl lettering, and lots more. Scroll down below to understand more about these product that is online tools you can use to get more creative purposes. 1. T-shirt Designer Application : Online t-shirt designer tool could be the ultimate custom design tool software enables you to design your personal tee shirt online without any hassles. It allows the users to produce custom t-shirts online and customize the artwork of custom made t-shirts without leaving the comfort that is total of personal computers. It helps the users to flaunt their ultimate style statement and unique feeling of creativity. 2. Banner Designer Application : Banner design software is an extremely Rich that is popular Internet (RIA), that is most often employed for creating custom banners online. This kinds of online product design tools powered by various advanced technologies, including PHP, Flex, (X)Html, HTML5, JavaScript, jQuery, CSS and CSS3. It provides the conclusion users the flexibility to make their particular banner that is customized a few minutes and customize its design according to their individualistic requirements. It also allows an administrator to customize and extend the functionality of this tool to cater the specialized requirements. 3. Sign Design Software : it really is a web-based custom product designing software that is extremely ideal for users who wish to make your own personal signs. Sign design online application is a "what you see is really what you will get" (WYSIWUG) style of custom online design software, meaning that - what you create and see on your computer screen is really what you will get. The end users can easily upload images from their desktop, add the writing as well as color according to their custom requirements. One can also leverage the large clip-art that is pre-loaded of sign designer to create signs online. 4. Shoes Designer Application : It enables users to develop your own shoes online. The prominent features and functionality regarding the online shoe design software assist the users create customized designer shoes by uploading high quality images, adding colors and special effects. As well as that, the users may also access an extensive collection of nice-looking fonts and clip arts that the shoe that is online offers to design shoes online. 5. Skin Design Software : It is used to produce custom skins for laptop, iPad, iPod and iPads on the internet. Your skin design application is extremely popular between the users since the designing that is ultimate to create wonderful artwork for custom designer laptop skins or vinyl laptop skins, laptop cases, iPod skins, iPad skins or iPad skins. With all the advent of aforementioned useful online designer software applications, any amateur designers can make own customized products with an ease of online and flaunt their particular sense of creativity to your whole world. Click on custom Tshirt Designer Software and Online Product Designer Tools to learn more.
The monthly fee you pay will go up as your revenue rises.

You are able to avoid that extra fee from Shopify by selecting Shopify Pay as your payment option. One area where Shopify has got the advantage is its point-of-sale option. This permits one to complete in-person sales throughout your web store, something that can help you manage inventory in the event that you regularly meet customers in person. Just one for the two shopping cart platforms offers fulfillment as a built-in feature. The Shopify Fulfillment Network suggests what fulfillment center you should ship your products to, based on where your orders are coming from, notifies you when inventory is running low, and offers a custom packing option. You manage everything except the pick and pull from your own admin dashboard. Shopify charges storage fees, predicated on square footage of space found in their warehouse, and a transaction fee that is per-item. Needless to say, you may want to elect to make use of a fulfillment service that is third-party. While BigCommerce integrates with nearly two dozen third-party fulfillment services, it doesn't offer an option that is in-house. Some fulfillment services charge monthly fees as well as others by the item. If using a fulfillment service is one of the eCommerce goals, you’ll need certainly to do more research of this type. For most of us, pricing is an essential consideration when choosing a shopping cart. Both BigCommerce and Shopify offer relatively plans that are cost-effective. They also both provide free, no-credit-card-required trial periods (15 days for BigCommerce; 14 days for Shopify) and don’t charge for setting up or canceling plans. You won’t need to pull your credit card out before the trial period ends. Each shopping cart platform offered pricing that is tiered. Prices shown are billed annually; monthly rates can be found and will be slightly higher. You are able to choose monthly, rather than agree to a full year, if you want more time to check the website after the free trial period is up. Lite: $9/month- Embeddable cart, enabled face-to-face purchases, and a buy button you can include to social networking pages, but no standalone store website. On both platforms, each step up in plan grants users more features and admin accounts. But each platform has a difference that is key the other. Because the prices on each are virtually identical, you’ll need certainly to pick your poison in terms of these drawbacks. On BigCommerce, each plan is sold with a sales limit. The monthly fee you pay will go up as your revenue rises. On Shopify, you’ll pay transaction fees which range from 0.5% to 2% of each sale you make. Fortunately, if you choose (and are usually eligible) to use Shopify’s payment that is in-house, Shopify Payments, you’re exempt with this extra commission per sale.
1 Shopify vs BigCommerce: Head-to-Head
Hosting and security
Products: modify
Visitor count
6 Which Has the Better Design
The great news is that both services are competitively priced overall, offering unlimited online storage, bandwidth, and products on all plans. As long as you recognize one of the keys differences, you truly can’t get wrong into the price department. BigCommerce and Shopify each offer easy-to-use admins. As you choose a theme, change settings, and load products and images if you’ve posted to a WordPress blog or sold on Etsy in the past, you’re not going to have much trouble on either platform. Both also extend a helping hand via phone support, forums, a knowledge base, video tutorials, and more if you find yourself looking for assistance with the setup. BigCommerce offers a admin that is user-friendly that makes it simple to execute tasks necessary to get the store operational. Since BigCommerce delivers more functionality that is out-of-the-box Shopify, you’ll have for more information elements in order to navigate the backend. Whenever you log in to Shopify, you’ll find one of the cleanest user interfaces on the market. Everything you’re looking for is easily available in the sidebar towards the left. It’s very easy to add products, create discounts, and edit your site’s content via smart WYSIWYG (what the truth is is exactly what you receive) editing tools. The simple truth is, BigCommerce and Shopify both provide the features, navigation, and usability you anticipate from a top-ranking shopping cart software solution. Shopify may eke out an incredibly narrow win here, however, since it’s a less complicated out-of-the-box program for most beginners. At the end associated with your choice will depend entirely on personal preference day. You’ll just have to try out both to see which is more intuitive for you. Try out BigCommerce’s and Shopify’s ease of use by signing up for free trials of each platform. Both carts offer a good amount of assistance in the form of 24/7 support via phone, email, and live chat - which can be already more than many eCommerce solutions can claim. BigCommerce maintains a forum that is helpful resource center, and knowledgebase. Whilst in the past there have been complaints about BigCommerce’s customer support, current reviewers report a much more experience that is positive. In fact, more than half regarding the reviewers rate the platform as Great or Excellent. Some reading user reviews declare that BigCommerce provides the support that is best they’ve ever received comparing it favorably by name to competitors. Shopify’s published support materials are equally impressive and can include a forum, blog, and knowledgebase. Users are divided within their opinions of Shopify’s support. The majority of recent complaints involve chargebacks, an activity where customers contest a charge and request a refund.
Shopify’s customer support team seems to be attentive to those complaints, even when users are not at all times pleased with the answers they receive based on the terms of service they consented to. On balance, most users seem adequately pleased with the platform they choose. Again, the free trial period presents a good opportunity to test the company’s responsiveness and help resources. We spent hours examining user feedback about Shopify and BigCommerce, and inspite of the inevitable negative reviews for both platforms, they each score very well overall across multiple review sites. As you can see, BigCommerce ranks just slightly behind Shopify in three key areas: simplicity of use, quality of support, and ease of setup. You can see that in the scheme that is grand both platforms are top-notch. Still, Shopify has an edge over BigCommerce in user satisfaction. For Shopify, the most common accolade is for ease-of-use. We agree -the UI really can’t get alot more straightforward. Numerous others like the stellar themes, vast app store, and 24/7 support. Meanwhile, Shopify complaints have a tendency to center round the expense of add-ons to obtain features that are advanced or the cart’s transaction fees (remember: those fees are waived if you are using Shopify Payments). BigCommerce merchants report satisfaction utilizing the cart’s lack of extra transaction fees, in addition to its robust feature set out-of-the-box. I’ve often read specific praise for the strong SEO tools, built-in marketing features, the capacity to create and manage numerous product variants, and one-page checkout. Even though many customers report that BigCommerce is easy to use, you’ll also find more feedback that points to an intimidating curve that is learning complete beginners. When I read complaints in regards to the need for a developer, however, i enjoy remember that it’s possible that users are attempting to accomplish more technical functions with BigCommerce. On top of that, customers sometimes complain about a lack of layout control for templates, which makes sense considering there’s no native drag-and-drop tool. While you research BigCommerce, you may even come across some complaints about the pricing structure change that happened many years ago. Remember that while these complaints are totally valid, they have been voiced by a minority and are usually falling further into the past. BigCommerce offers 1,074 helpful and smart integrations, in 20 categories ranging from accounting to B2B/wholesale to product sourcing and everything in between. Which includes big names like MailChimp, Quickbooks Online, and Facebook ad extensions as well as smaller but still useful players. Still, in comparison to Shopify’s 2,693 apps, BigCommerce takes second place. Bear in mind, however, that BigCommerce comes with additional extras from the box that Shopify may charge a fee to download.
1 note
·
View note
Photo

How to Create Your Own AJAX WooCommerce Wishlist Plugin
In this tutorial we will create lightweight wishlist functionality for WooCommerce using AJAX, WordPress REST API, and SVG graphics. WooCommerce doesn’t come with wishlist functionality as standard, so you’ll always need to rely on an extension to do the work for you. Unless you build it yourself for complete control..
Wish Upon a Star
Wishlist functionality will allow users to mark certain products, adding them to a list for future reference. In some eCommerce stores (such as Amazon) multiple wishlists can be created, and these can be shared with others, which makes them ideal for birthdays or weddings. In our case, the WooCommerce wishlist we’re going to create will enable customers to easily revisit products they’re considering.
Our wishlist functionality will add a heart icon to the product thumbs, which when clicked will add the product to a wishlist in a table.
Click the heart icon to add a product to the wishlist
Take a look at the demo for a proper idea of how it works.
1. Create the Plugin Structure
Let’s start by building our plugin. Create a folder with the name “wishlist” and a PHP file with the same name. Add the following snippet to the PHP file:
/* Plugin Name: Woocommerce wishlist Plugin URI: https://www.enovathemes.com Description: Ajax wishlist for WooCommerce Author: Enovathemes Version: 1.0 Author URI: http://enovathemes.com */ if ( ! defined( 'ABSPATH' ) ) { exit; // Exit if accessed directly }
We won’t go into detail about the plugin creation process, but if you are new to plugin development I highly recommend this amazing new course by Rachel McCollin:
WordPress
Introduction to WordPress Plugin Development
Rachel McCollin
Add the Plugin Functions
Let’s sketch out our plan so we know what to build:
Add wishlist toggle to products in loop and single pages using WooCommerce hooks
Create wishlist table shortcode to hold the products added to the wishlist
Create wishlist custom option in the user profile
All the plugin code will go inside the init action for the plugin, as we first need to make sure that the WooCommerce plugin is active. So right after the plugin details add the following code:
add_action('init','plugin_init'); function plugin_init(){ if (class_exists("Woocommerce")) { // Code here } }
And now let’s enqueue our plugin scripts and styles.
Add the following code to the main plugin file:
function wishlist_plugin_scripts_styles(){ wp_enqueue_style( 'wishlist-style', plugins_url('/css/style.css', __FILE__ ), array(), '1.0.0' ); wp_enqueue_script( 'wishlist-main', plugins_url('/js/main.js', __FILE__ ), array('jquery'), '', true); wp_localize_script( 'main', 'opt', array( 'ajaxUrl' => admin_url('admin-ajax.php'), 'ajaxPost' => admin_url('admin-post.php'), 'restUrl' => rest_url('wp/v2/product'), 'shopName' => sanitize_title_with_dashes(sanitize_title_with_dashes(get_bloginfo('name'))), 'inWishlist' => esc_html__("Already in wishlist","text-domain"), 'removeWishlist' => esc_html__("Remove from wishlist","text-domain"), 'buttonText' => esc_html__("Details","text-domain"), 'error' => esc_html__("Something went wrong, could not add to wishlist","text-domain"), 'noWishlist' => esc_html__("No wishlist found","text-domain"), ) ); } add_action( 'wp_enqueue_scripts', 'wishlist_plugin_scripts_styles' );
Here we enqueue the main style.css file and the main.js file for the plugin, also we pass some parameters to the main.js file to work with:
ajaxUrl – required to fetch some data from WordPress, like current User ID
ajaxPost – required to update user wishlist
restUrl – required to list the wishlist items in the wishlist table
shopName – required to add wishlist items to the session storage for non-registered or non-logged-in users
And some strings instead of hardcoding them into the js file, in case they need to be translatable.
So for now create a css, and js folder and put the corresponding files inside those folders: style.css in the css folder and main.js in the js folder.
2. Hook the Wishlist Toggle
Right inside the init action add the following code:
// Add wishlist to product add_action('woocommerce_before_shop_loop_item_title','wishlist_toggle',15); add_action('woocommerce_single_product_summary','wishlist_toggle',25); function wishlist_toggle(){ global $product; echo '<span class="wishlist-title">'.esc_attr__("Add to wishlist","text-domain").'</span><a class="wishlist-toggle" data-product="'.esc_attr($product->get_id()).'" href="#" title="'.esc_attr__("Add to wishlist","text-domain").'">'.file_get_contents(plugins_url( 'images/icon.svg', __FILE__ )).'</a>'; }
Here we add a wishlist toggle to each product in the loop and to each single product layout, using the woocommerce_before_shop_loop_item_title and woocommerce_single_product_summary hooks.
Here I want to point out the data-product attribute that contains the product ID–this is required to power the wishlist functionality. And also take a closer look at the SVG icon–this is required to power the animation.
3. Add SVG Icons
Now create an images folder in the plugin folder and put the following icon.svg in it:
<svg viewBox="0 0 471.701 471.701"> <path class="heart" d="M433.601,67.001c-24.7-24.7-57.4-38.2-92.3-38.2s-67.7,13.6-92.4,38.3l-12.9,12.9l-13.1-13.1 c-24.7-24.7-57.6-38.4-92.5-38.4c-34.8,0-67.6,13.6-92.2,38.2c-24.7,24.7-38.3,57.5-38.2,92.4c0,34.9,13.7,67.6,38.4,92.3 l187.8,187.8c2.6,2.6,6.1,4,9.5,4c3.4,0,6.9-1.3,9.5-3.9l188.2-187.5c24.7-24.7,38.3-57.5,38.3-92.4 C471.801,124.501,458.301,91.701,433.601,67.001z M414.401,232.701l-178.7,178l-178.3-178.3c-19.6-19.6-30.4-45.6-30.4-73.3 s10.7-53.7,30.3-73.2c19.5-19.5,45.5-30.3,73.1-30.3c27.7,0,53.8,10.8,73.4,30.4l22.6,22.6c5.3,5.3,13.8,5.3,19.1,0l22.4-22.4 c19.6-19.6,45.7-30.4,73.3-30.4c27.6,0,53.6,10.8,73.2,30.3c19.6,19.6,30.3,45.6,30.3,73.3 C444.801,187.101,434.001,213.101,414.401,232.701z"/> <g class="loading"> <path d="M409.6,0c-9.426,0-17.067,7.641-17.067,17.067v62.344C304.667-5.656,164.478-3.386,79.411,84.479 c-40.09,41.409-62.455,96.818-62.344,154.454c0,9.426,7.641,17.067,17.067,17.067S51.2,248.359,51.2,238.933 c0.021-103.682,84.088-187.717,187.771-187.696c52.657,0.01,102.888,22.135,138.442,60.976l-75.605,25.207 c-8.954,2.979-13.799,12.652-10.82,21.606s12.652,13.799,21.606,10.82l102.4-34.133c6.99-2.328,11.697-8.88,11.674-16.247v-102.4 C426.667,7.641,419.026,0,409.6,0z"/> <path d="M443.733,221.867c-9.426,0-17.067,7.641-17.067,17.067c-0.021,103.682-84.088,187.717-187.771,187.696 c-52.657-0.01-102.888-22.135-138.442-60.976l75.605-25.207c8.954-2.979,13.799-12.652,10.82-21.606 c-2.979-8.954-12.652-13.799-21.606-10.82l-102.4,34.133c-6.99,2.328-11.697,8.88-11.674,16.247v102.4 c0,9.426,7.641,17.067,17.067,17.067s17.067-7.641,17.067-17.067v-62.345c87.866,85.067,228.056,82.798,313.122-5.068 c40.09-41.409,62.455-96.818,62.344-154.454C460.8,229.508,453.159,221.867,443.733,221.867z"/> </g> <g class="check"> <path d="M238.933,0C106.974,0,0,106.974,0,238.933s106.974,238.933,238.933,238.933s238.933-106.974,238.933-238.933 C477.726,107.033,370.834,0.141,238.933,0z M238.933,443.733c-113.108,0-204.8-91.692-204.8-204.8s91.692-204.8,204.8-204.8 s204.8,91.692,204.8,204.8C443.611,351.991,351.991,443.611,238.933,443.733z"/> <path d="M370.046,141.534c-6.614-6.388-17.099-6.388-23.712,0v0L187.733,300.134l-56.201-56.201 c-6.548-6.78-17.353-6.967-24.132-0.419c-6.78,6.548-6.967,17.353-0.419,24.132c0.137,0.142,0.277,0.282,0.419,0.419 l68.267,68.267c6.664,6.663,17.468,6.663,24.132,0l170.667-170.667C377.014,158.886,376.826,148.082,370.046,141.534z"/> </g> </svg>
If you are new to working with SVGs I highly recommend you read these amazing tutorials on the subject:
SVG
How to Hand Code SVG
Kezz Bracey
SVG
SVG Viewport and viewBox (For Complete Beginners)
Kezz Bracey
Our SVG animation has 3 states:
Default: the heart path
Process: loading group (g tag)
End: check group (g tag)
If you now go to your shop page you will see the unstyled SVG icons piled on top of each other:
Let’s add some styling to fix this mess! Open the style.css file and paste the following code:
.wishlist-toggle { display: block; position: absolute; top: 16px; left: 16px; z-index: 5; width: 24px; height: 24px; outline: none; border:none; } .wishlist-title { display: none; } .entry-summary .wishlist-toggle { position: relative; top: 0; left: 0; display: inline-block; vertical-align: middle; margin-bottom: 8px; } .entry-summary .wishlist-title { display: inline-block; vertical-align: middle; margin-right: 8px; margin-bottom: 8px; } .wishlist-toggle:focus { outline: none; border:none; } .wishlist-toggle svg { fill:#bdbdbd; transition: all 200ms ease-out; } .wishlist-toggle:hover svg, .wishlist-toggle.active svg { fill:#000000; } .wishlist-toggle svg .loading, .wishlist-toggle svg .check { opacity: 0; } .wishlist-toggle.active svg .check { opacity: 1; } .wishlist-toggle.active svg .heart { opacity: 0; } .wishlist-toggle.loading svg .loading, .wishlist-table.loading:before { animation:loading 500ms 0ms infinite normal linear; transform-origin: center; opacity: 1; } .wishlist-toggle.loading svg .heart { opacity:0; } @keyframes loading { from {transform: rotate(0deg);} to {transform: rotate(360deg);} }
The logic here is as follows:
Initially we show the heart path of our SVG.
When the user clicks on it we will hide the heart path and show the loading path.
Once the loading finishes we will show the checkmark indicating that the product was successfully added to the wishlist.
We will toggle the loading state via JavaScript later; the loading animation is a simple transform rotate. So for now if you refresh the page (don’t forget to clear the browser cache as sometimes old styles are cached) you will see a nice heart icon with each product.
This toggle currently does nothing, so we’ll sort that out. But for now let’s keep with our plan.
4. Create Wishlist Table Shortcode
Add the following code in the init plugin action:
// Wishlist table shortcode add_shortcode('wishlist', 'wishlist'); function wishlist( $atts, $content = null ) { extract(shortcode_atts(array(), $atts)); return '<table class="wishlist-table loading"> <tr> <th><!-- Left for image --></th> <th>'.esc_html__("Name","text-domain").'</th> <th>'.esc_html__("Price","text-domain").'</th> <th>'.esc_html__("Stock","text-domain").'</th> <th><!-- Left for button --></th> </tr> </table>'; }
This is a very simple shortcode that you can add to any page, and the wishlist items will appear inside it. I won’t describe the shortcode creation process, but if you are new to this, I highly recommend reading this amazing tutorial:
Plugins
Getting Started With WordPress Shortcodes
Rohan Mehta
Make a Wishlist Page
Now from inside the WP admin create a page called “Wishlist” and put the [wishlist] shortcode inside it. Now if you go to the wishlist page you will see an empty table.
Did you notice the loading class on the table? We will remove the loading class with JavaScript later, once the wishlist items are ready to be appended to the table. But for now open the style.css and add the following code:
.wishlist-table { width:100%; position: relative; } .wishlist-table.loading:after { display: block; width: 100%; height: 100%; position: absolute; top: 0; left: 0; content: ""; background: #ffffff; opacity: 0.5; z-index: 5; } .wishlist-table.loading:before { display: block; width: 24px; height: 24px; position: absolute; top: 50%; left: 50%; margin-top:-12px; margin-left:-12px; content: ""; background-image: url('../images/loading.svg'); background-repeat: no-repeat; background-size: 100%; z-index: 6; } .wishlist-table td { position: relative; } .wishlist-table a.details { padding:4px 16px; background: #000000; color: #ffffff; text-align: center; border:none !important } .wishlist-table a.wishlist-remove { display: block; width: 24px; height: 24px; position: absolute; top: 50%; left: 50%; margin-top:-12px; margin-left:-12px; background-image: url('../images/remove.svg'); background-repeat: no-repeat; background-size: 100%; z-index: 6; border:none; opacity:0; } .wishlist-table td:hover > a.wishlist-remove { opacity:1; }
Add the loading.svg image to the images folder:
<svg xmlns="http://www.w3.org/2000/svg" xmlns:xlink="http://www.w3.org/1999/xlink" viewBox="0 0 471.701 471.701"> <path d="M409.6,0c-9.426,0-17.067,7.641-17.067,17.067v62.344C304.667-5.656,164.478-3.386,79.411,84.479 c-40.09,41.409-62.455,96.818-62.344,154.454c0,9.426,7.641,17.067,17.067,17.067S51.2,248.359,51.2,238.933 c0.021-103.682,84.088-187.717,187.771-187.696c52.657,0.01,102.888,22.135,138.442,60.976l-75.605,25.207 c-8.954,2.979-13.799,12.652-10.82,21.606s12.652,13.799,21.606,10.82l102.4-34.133c6.99-2.328,11.697-8.88,11.674-16.247v-102.4 C426.667,7.641,419.026,0,409.6,0z"/> <path d="M443.733,221.867c-9.426,0-17.067,7.641-17.067,17.067c-0.021,103.682-84.088,187.717-187.771,187.696 c-52.657-0.01-102.888-22.135-138.442-60.976l75.605-25.207c8.954-2.979,13.799-12.652,10.82-21.606 c-2.979-8.954-12.652-13.799-21.606-10.82l-102.4,34.133c-6.99,2.328-11.697,8.88-11.674,16.247v102.4 c0,9.426,7.641,17.067,17.067,17.067s17.067-7.641,17.067-17.067v-62.345c87.866,85.067,228.056,82.798,313.122-5.068 c40.09-41.409,62.455-96.818,62.344-154.454C460.8,229.508,453.159,221.867,443.733,221.867z"/> </svg>
This is the same loading SVG separated from the main icon.svg. We could use SVG sprites, but I decided to stick with a separate loading SVG.
Now, if you go to the wishlist page and refresh it you will see an empty table with loading on it. Nice, let’s move further.
5. Wishlist Custom Option in the User Profile
Our wishlist functionality will work both for logged-in users and guest users. With logged-in users we’ll store the wishlist information in the user’s metadata, and with guest users we’ll store the wishlist in the session storage.
You can also store the guest users’ wishlist in local storage, the difference being that session storage is destroyed when the user closes the tab or browser, and local storage is destroyed when the browser cache is cleared. It is up to you which option you use for guest users.
Now add the following code to the init action:
// Wishlist option in the user profile add_action( 'show_user_profile', 'wishlist_user_profile_field' ); add_action( 'edit_user_profile', 'wishlist_user_profile_field' ); function wishlist_user_profile_field( $user ) { ?> <table class="form-table wishlist-data"> <tr> <th><?php echo esc_attr__("Wishlist","text-domain"); ?></th> <td> <input type="text" name="wishlist" id="wishlist" value="<?php echo esc_attr( get_the_author_meta( 'wishlist', $user->ID ) ); ?>" class="regular-text" /> </td> </tr> </table> <?php } add_action( 'personal_options_update', 'save_wishlist_user_profile_field' ); add_action( 'edit_user_profile_update', 'save_wishlist_user_profile_field' ); function save_wishlist_user_profile_field( $user_id ) { if ( !current_user_can( 'edit_user', $user_id ) ) { return false; } update_user_meta( $user_id, 'wishlist', $_POST['wishlist'] ); }
Again, in order to remain within the scope of this tutorial, I won’t explain how to work with user metadata. If you are new to this I highly recommend reading this amazing tutorial:
WordPress
How to Work With WordPress User Metadata
Tom McFarlin
All we do here is create a text field input that will hold the wishlist items comma-separated IDs. With show_user_profile and edit_user_profile actions we add the structure of the input field, and with personal_options_update and edit_user_profile_update actions we power the save functionality.
So once the wishlist is updated it will save to the database. I you go to your profile page you will see a new text field added to it. Add whatever value you want and hit save to test if the update functionality works. With admin CSS you can hide this field if you don’t want users to see it. I will leave it as is.
6. Turn it On!
Now we are ready to power everything up!
Open the main.js file and put the following code in it:
(function($){ "use strict"; })(jQuery);
All our code will go inside this function.
Now let’s gather the required data and create some variables:
var shopName = opt.shopName+'-wishlist', inWishlist = opt.inWishlist, restUrl = opt.restUrl, wishlist = new Array, ls = sessionStorage.getItem(shopName), loggedIn = ($('body').hasClass('logged-in')) ? true : false, userData = '';
As you might remember when we enqueued our main.js script we passed some parameters to it. Here, with JavaScript, we can collect these parameters.
Next, we will create an empty wishlist array that will contains wishlist items. We will need the session storage data with our shop name (the ls variable stands for local storage), and we will need to know if the user is guest or logged-in.
Let me explain the logic here: whenever the user visits the shop page we will need to know if he or she is logged-in or is a guest-user. If the user is logged-in we will need to check if he or she has wishlist items, and if so highlight these items. If not we need to see if there are any items in the session/local storage and highlight those.
Why this is done like this? Imagine, if the user first visits the website as a guest, adds items to the wishlist, and then decides to login. If the user does not have items registered in the profile wishlist, we will need to show the ones that he or she added before login, that are stored in the session/local storage.
So let’s do that step by step:
If User is Logged-in
Fetch current user data with AJAX
If success update the wishlist
Highlight the wishlist items
Remove the session/local storage
If fail show error message in the console for the developer
if(loggedIn) { // Fetch current user data $.ajax({ type: 'POST', url: opt.ajaxUrl, data: { 'action' : 'fetch_user_data', 'dataType': 'json' }, success:function(data) { userData = JSON.parse(data); if (typeof(userData['wishlist']) != 'undefined' && userData['wishlist'] != null && userData['wishlist'] != "") { var userWishlist = userData['wishlist']; userWishlist = userWishlist.split(','); if (wishlist.length) { wishlist = wishlist.concat(userWishlist); $.ajax({ type: 'POST', url:opt.ajaxPost, data:{ action:'user_wishlist_update', user_id :userData['user_id'], wishlist :wishlist.join(','), } }); } else { wishlist = userWishlist; } wishlist = wishlist.unique(); highlightWishlist(wishlist,inWishlist); sessionStorage.removeItem(shopName); } else { if (typeof(ls) != 'undefined' && ls != null) { ls = ls.split(','); ls = ls.unique(); wishlist = ls; } $.ajax({ type: 'POST', url:opt.ajaxPost, data:{ action:'user_wishlist_update', user_id :userData['user_id'], wishlist :wishlist.join(','), } }) .done(function(response) { highlightWishlist(wishlist,inWishlist); sessionStorage.removeItem(shopName); }); } }, error: function(){ console.log('No user data returned'); } }); }
If User is Guest
Fetch wishlist from the session/local storage
else { if (typeof(ls) != 'undefined' && ls != null) { ls = ls.split(','); ls = ls.unique(); wishlist = ls; } }
As you may have noticed here we have double-AJAX and some helper functions. So first let’s create the actions of the AJAX requests, and after that I will explain our helper functions. I won’t describe in detail the AJAX functionality in WordPress, but if you are new to AJAX and WordPress, I highly recommend reading this amazing tutorial on it:
Plugins
A Primer on Ajax in the WordPress Frontend: Understanding the Process
Tom McFarlin
Our first AJAX request gets the user id and the user wishlist data from WordPress. This is done with a custom AJAX action added to the plugin code file:
// Get current user data function fetch_user_data() { if (is_user_logged_in()){ $current_user = wp_get_current_user(); $current_user_wishlist = get_user_meta( $current_user->ID, 'wishlist',true); echo json_encode(array('user_id' => $current_user->ID,'wishlist' => $current_user_wishlist)); } die(); } add_action( 'wp_ajax_fetch_user_data', 'fetch_user_data' ); add_action( 'wp_ajax_nopriv_fetch_user_data', 'fetch_user_data' );
The most important part here is the action name (fetch_user_data)–make sure it is the same for AJAX and for functions wp_ajax_fetch_user_data and wp_ajax_nopriv_fetch_user_data. Here we’re preparing JSON formatted data with user ID and user wishlist data.
Our next AJAX request updates the user wishlist if there were already wishlist items from session/local storage. Take a close look at the url option–see it is different.
The logic is the same as for the first action–the difference is that here we don’t return or echo any data, but we update the wishlist option for the current user.
function update_wishlist_ajax(){ if (isset($_POST["user_id"]) && !empty($_POST["user_id"])) { $user_id = $_POST["user_id"]; $user_obj = get_user_by('id', $user_id); if (!is_wp_error($user_obj) && is_object($user_obj)) { update_user_meta( $user_id, 'wishlist', $_POST["wishlist"]); } } die(); } add_action('admin_post_nopriv_user_wishlist_update', 'update_wishlist_ajax'); add_action('admin_post_user_wishlist_update', 'update_wishlist_ajax');
And if our user is a guest we will need to check if there are any wishlist details in the session/local storage.
Helper Functions
Before we move to the events part I want to explain our helper functions
Array.prototype.unique = function() { return this.filter(function (value, index, self) { return self.indexOf(value) === index; }); } function isInArray(value, array) {return array.indexOf(value) > -1;} function onWishlistComplete(target, title){ setTimeout(function(){ target .removeClass('loading') .addClass('active') .attr('title',title); },800); } function highlightWishlist(wishlist,title){ $('.wishlist-toggle').each(function(){ var $this = $(this); var currentProduct = $this.data('product'); currentProduct = currentProduct.toString(); if (isInArray(currentProduct,wishlist)) { $this.addClass('active').attr('title',title); } }); }
The first helper function makes the array unique, by removing duplicates, the second one checks if the given value is present in the given array. The next function executes when an item is added to the wishlist and the last one shows items that are in the wishlist.
Add Toggle
Now let’s add a click event to the wishlist toggle to power the actual functionality. On each toggle click event the animation is triggered and if the user is logged-in the wishlist update action fires with AJAX. If the user is a guest the item is added to the session/local storage.
Now if you go to the shop page, refresh the browser, and click on any wishlist toggle you will see it is working!
$('.wishlist-toggle').each(function(){ var $this = $(this); var currentProduct = $this.data('product'); currentProduct = currentProduct.toString(); if (!loggedIn && isInArray(currentProduct,wishlist)) { $this.addClass('active').attr('title',inWishlist); } $(this).on('click',function(e){ e.preventDefault(); if (!$this.hasClass('active') && !$this.hasClass('loading')) { $this.addClass('loading'); wishlist.push(currentProduct); wishlist = wishlist.unique(); if (loggedIn) { // get user ID if (userData['user_id']) { $.ajax({ type: 'POST', url:opt.ajaxPost, data:{ action:'user_wishlist_update', user_id :userData['user_id'], wishlist :wishlist.join(','), } }) .done(function(response) { onWishlistComplete($this, inWishlist); }) .fail(function(data) { alert(opt.error); }); } } else { sessionStorage.setItem(shopName, wishlist.toString()); onWishlistComplete($this, inWishlist); } } }); });
7. List Items in Wishlist Table
Now it is time to list our wishlist items in the wishlist table we created earlier.
Add the following code into main.js at the very bottom of our wrapper function:
setTimeout(function(){ if (wishlist.length) { restUrl += '?include='+wishlist.join(','); restUrl += '&per_page='+wishlist.length; $.ajax({ dataType: 'json', url:restUrl }) .done(function(response){ $('.wishlist-table').each(function(){ var $this = $(this); $.each(response,function(index,object){ $this.append('<tr data-product="'+object.id+'"><td><a class="wishlist-remove" href="#" title="'+opt.removeWishlist+'"></a>'+object.image+'</td><td>'+object.title["rendered"]+'</td><td>'+object.price+'</td><td>'+object.stock+'</td><td><a class="details" href="'+object.link+'">'+opt.buttonText+'</a></td></tr>'); }); }); }) .fail(function(response){ alert(opt.noWishlist); }) .always(function(response){ $('.wishlist-table').each(function(){ $(this).removeClass('loading'); }); }); } else { $('.wishlist-table').each(function(){ $(this).removeClass('loading'); }); } },1000);
Here we are using the WordPress REST API to get the products by ID in the wishlist array.
For each of the products we get we are adding a table row with the required data to display. We need the product image, title, stock status, button and price.
Here we have two options for the REST API:
using the WordPress REST API
using the WooCommerce REST API.
The difference here is that product data is already present in the Woocommerce REST API, but an API key is required. With the default WordPress REST API product data is absent by default, but can be added, and no API key is required. For such a simple task as a wishlist I don’t think that an API key is needed, so we will do it by extending the default WordPress REST API to return our product price, image code and the stock level.
Go to the main plugin file and at the very bottom add the following code:
// Extend REST API function rest_register_fields(){ register_rest_field('product', 'price', array( 'get_callback' => 'rest_price', 'update_callback' => null, 'schema' => null ) ); register_rest_field('product', 'stock', array( 'get_callback' => 'rest_stock', 'update_callback' => null, 'schema' => null ) ); register_rest_field('product', 'image', array( 'get_callback' => 'rest_img', 'update_callback' => null, 'schema' => null ) ); } add_action('rest_api_init','rest_register_fields'); function rest_price($object,$field_name,$request){ global $product; $id = $product->get_id(); if ($id == $object['id']) { return $product->get_price(); } } function rest_stock($object,$field_name,$request){ global $product; $id = $product->get_id(); if ($id == $object['id']) { return $product->get_stock_status(); } } function rest_img($object,$field_name,$request){ global $product; $id = $product->get_id(); if ($id == $object['id']) { return $product->get_image(); } } function maximum_api_filter($query_params) { $query_params['per_page']["maximum"]=100; return $query_params; } add_filter('rest_product_collection_params', 'maximum_api_filter');
All this does is create new fields for REST API and extends the maximum items limit per request. Again, if you are new to this subject I highly recommend reading this series.
For now, if you go to your wishlist table and refresh the page you will see the list of items that are added to your wishlist.
8. Removing Items From Wishlist
We are almost done; only the remove functionality remains. So let’s create that! Add the following code at the very bottom of the wrapper function in the main.js file
$(document).on('click', '.wishlist-remove', function(){ var $this = $(this); $this.closest('table').addClass('loading'); wishlist = []; $this.closest('table').find('tr').each(function(){ if ($(this).data('product') != $this.closest('tr').data('product')) { wishlist.push($(this).data('product')); if (loggedIn) { // get user ID if (userData['user_id']) { $.ajax({ type: 'POST', url:opt.ajaxPost, data:{ action:'user_wishlist_update', user_id :userData['user_id'], wishlist :wishlist.join(','), } }) .done(function(response) { $this.closest('table').removeClass('loading'); $this.closest('tr').remove(); }) .fail(function(data) { alert(opt.error); }); } } else { sessionStorage.setItem(shopName, wishlist.toString()); setTimeout(function(){ $this.closest('table').removeClass('loading'); $this.closest('tr').remove(); },500); } } }); });
Once the remove icon is clicked (make sure you have a remove.svg in the images folder, you can use whatever icon you want), we need to check if the user is logged-in. If so, we then remove the item ID from the wishlist using AJAX with the user_wishlist_update action. If the user is a guest we need to remove the item ID from the session/local storage.
Now go to your wishlist and refresh the page. Once you click on the remove icon your item will be removed from the wishlist.
Conclusion
That was quite a project! A simple, but comprehensive wishlist feature for your WooCommerce stores. You are free to use this plugin in any project; you can extend, modify it and make suggestions. I hope you liked it. Here is the link to the source files on GitHub. And here is the demo.
Learn More WooCommerce Theme Development
At Tuts+ we have a great collection of tutorials and courses to learn WooCommerce development. Check out these four great courses to get started!
WooCommerce
Up and Running With WooCommerce
Rachel McCollin
WordPress
Developing a WooCommerce Theme
Rachel McCollin
WordPress
Go Further With WooCommerce Themes
Rachel McCollin
WordPress
How to Make Your Theme WooCommerce Compatible
Rachel McCollin
by Karen Pogosyan via Envato Tuts+ Code https://ift.tt/2WTWfiG
1 note
·
View note
Text
Php json decode as object

#Php json decode as object how to#
Let’s take the first example, here we will convert the JSON string to PHP array using the json_decode() function. Reviver method object can be passed in JSON.parse() to return a modified object of JSON in case of custom logic requires to add and return the different.
options: It includes bitmask of JSON_OBJECT_AS_ARRAY, JSON_BIGINT_AS_STRING, JSON_THROW_ON_ERROR.
#Php json decode as object how to#
Let’s see how to do it in practice with a few examples. There exist specific built-in functions that allow encoding and decoding JSON data. The data structures of JSON are identical to PHP arrays. Follow the steps and you’ll manage to meet your goal easily. Chapter 2 JSON encoding Creating a JSON object with PHP is simple: You just need to use the jsonencode () function. In this snippet, you can find a step-by-step guide on how to create and parse JSON data with PHP. depth: It states the recursion depth specified by user. Decode a JSON object received by your PHP script.If it is true then objects returned will be converted into associative arrays. Normally, jsondecode() will return an object of stdClass if the top level item in the JSON object is a dictionary or an indexed array if the JSON object. It only works with UTF-8 encoded strings. json: It holds the JSON string which need to be decode.The syntax of JSON decode function is:- json_decode(string, assoc, depth=500, options) Parameters of json_decode() function PHP: json_decode() | How to decode json to array in PHPĭefination:- The PHP json_decode() function, which is used to decode or convert a JSON object to a PHP object. An optional Assoc boolean to instruct whether to bypass conversion to an object and to produce an associative array. The decode function has the following parameters. It basically accepts three parameters, but you will usually only need the first one, i.e. Now jsondecode() on the other hand, has a completely different goal, which is to only attempt to convert a JSON string to a PHP object or array. will decode the json string as array For some reason I’m able to extract the json string as array but when I try it to do it as object it breaks. Like, convert JSON string to array PHP, convert JSON string to multidimensional array PHP and JSON decode and access object value PHP. You can also turn your own data into a well-formatted JSON string in PHP with the help of the jsonencode () function. Be wary that associative arrays in PHP can be a 'list' or 'object' when converted to/from JSON, depending on the keys (of absence of them). When decoding that string with jsondecode, 10,000 arrays (objects) is created in memory and then the result is returned. In this tutorial, we will take examples using the json_decode() function. JSON can be decoded to PHP arrays by using the associative true option. Efficient, easy-to-use, and fast PHP JSON stream parser - GitHub - halaxa/json-machine: Efficient, easy-to-use, and fast PHP JSON stream parser. PHP JSON decode In this tutorial, we will discuss about php json_decode() function syntax, defination, parameters with examples.
0 notes
Text
PrintLab Studio

5504 Lilyview Way, Elk Grove, CA is a single-family home listed for-sale at $639,000. Home is a 5 bed, 3.0 bath property. Find 31 photos of the 5504 Lilyview Way home on Zillow. View more property details, sales history and Zestimate data on Zillow. MLS # 221034422. For Sale - 5504 Lilyview Way, Elk Grove, CA - $639,000. View details, map and photos of this single family property with 5 bedrooms and 3 total baths. LilyView is an easy to use lightweight image viewer View images, nothing more The point of LilyView is simple: elegant, efficient and fast. There is no heavy photo library, no collection of “enhancing” filters. 5665 Lilyview Way, Elk Grove, CA 95757 (MLS# 221024742) is a Single Family property with 5 bedrooms and 3 full bathrooms. 5665 Lilyview Way is currently listed. https://blogjuicy204.tumblr.com/post/657826755055370240/lilyview. 5566 Lilyview Way, Elk Grove, CA is currently not for sale. Single-family home is a 4 bed, 3.0 bath property. This home was built in 2003 and last sold on for $349,000. View more property details, sales history and Zestimate data on Zillow.
Trusted Mac download PrintLab Studio 2.1. Virus-free and 100% clean download. Get PrintLab Studio alternative downloads.
PrintLab Studio is a lightweight, easy-to-use vector-drawing illustration application for Mac OS X. PrintLab Studio has tools you need to create basic shapes.Create designs quickly and easily change styles.
The Printlab began in 1987 with 2 enlargers and a sink, and has grown into Chicago’s most storied integrated printing studio. As a bridge between the craftsmanship of analogue and the controlled speed of digital, we serve the needs of artists, photographers, hobbyists and novices worldwide. The printLab provides students and faculty with an array of services, ranging from wide-format and three-dimensional printing and support studio spaces that facilitate trimming/assembly, screen printing, and bookmaking projects.
This finish adds never before seen depth and color to your images. With this metal-like surface, images jump off the paper. We think it looks great on these types of photographs: Astro Photography Black and White Vibrant Landscape Night Scapes #printshop #printlab #ohiophotographer #clevelandphotographer #captureonlabs.
Agencija za zaštitu osobnih podataka, Zagreb
Amnesty International Hrvatske, Zagreb
Autonomni centar Čakovec
BLOK – lokalna baza za osvježavanje kulture, Zagreb
Centar za mirovne studije, Zagreb
Cenzura plus, Split
CESI, Zagreb
Čovjek na zemlji, Dubrovnik
Documenta, Zagreb
Dom za žrtve obiteljskog nasilja 'Sigurna kuća' Čakovec
Dugan d.o.o., Varaždin
Euromusic Agency d.o.o., Čakovec
GONG, Zagreb
Grad Prelog, Prelog
HDLUM, Čakove
Humana Nova , Čakovec
HZZ, Područna služba Čakovec
HZZ, Područna služba Varaždin
JEF Hrvatska, Zagreb
Koordinacija udruga stanara Republike Hrvatske, Rijeka
Krijesnica, Zagreb
Kristina Horvat Blažinović, akademska slikarica
Kuća ljudskih prava, Zagreb
Kvantum d.o.o. Prelog
Leško d.o.o., Vratišinec
Međimurska županija
Miramida centar, Grožnjan
Mreža mladih Hrvatske, Zagreb
Obiteljski centar Varaždinske županije
Partnerstvo za društveni razvoj – PSD, Zagreb
Proni, Osijek
Razbor d.o.o. Zagreb
Razvojna agencija grada Čakovca - ČAKRA d.o.o., Čakovec
Restart, Zagreb
Redea, Čakovec
SMART, Rijeka
TACSO ured u Hrvatskoj, Zagreb
Turistički i kulturnu informativni centar, Lepoglava
Udruga Delta, Rijeka
Udruga Domaći, Karlovac
Udruga gradova u Republici Hrvatskoj, Zagreb
Udruga Kneja , Čakovec
Udruga MI, Split
Udruga RODA, Zagreb
Udruga Suncokret, Pula
Udruga za demokratsko društvo, Zagreb
Udruga za samozastupanje, Zagreb
Udruga Zora, Čakovec
Udruga ZUM, Pula
Udruženje Zagreb Pride
UKE, Križevci
Varga Elektronik d.o.o., Draškovec
Volonterski centar Zagreb, Zagreb
Z.M.A.G., Dubranec
Zavod za javno zdravstvo Međimurske županije
Zelena akcija, Zagreb
Printlab constantly designs and produces new designs, and the collection changes continually, as designs are sold and new ones are created.
Tower of babel. We supply all of our prints in 150dpi adobe photoshop files or adobe illustrator files, depending on the print. Saving the client time and money.
All prints are in repeat, each colour is cleaned up and when layers are used to create a design these are included. Clients receive a cd-rom with the purchased print files as well as a print-out of the design.
Print Lab Studio Michael Shih
Mplayerx install. Prints from the collection can be purchased online by clicking “shop”
Alternatively, you can make an appointment to view the collection at the Printlab studio or for us to visit your office.
This online barcode generator demonstrates the capabilities of the TBarCode SDK barcode components. TBarCode simplifies bar code creation in your application - e.g. In C#.NET, VB.NET, Microsoft ® ASP.NET, ASP, PHP, Delphi and other programming languages. The Lite version enables you to create 1D Linear barcodes, customize the look, paste the barcodes into other applications, and save them as a graphic file. Upgrade to the Pro version and you'll receive all Linear and 2D Matrix barcodes including Code 128 and Data Matrix, more Graphic file choices such as jpg and png, advanced DDE integration. Barcode generator pro. Generate UPC, EAN, QR codes and Data Matrix on Barcodes Pro. Best UPC and EAN barcode services Worldwide. Pay for barcodes only once without any hidden annual or renewal service fees. Use our online barcode tools to buy Global Trade Item Numbers (GTIN), Universal Product Codes (UPC), European Article Numbers (EAN), generate barcodes, register your product information, search product details.
To arrange an appointment please contact Karen +45 3539 5474 / +45 2612 5474 or e-mail [email protected]
Printlab is one of Scandinavia's leading design studios, specializing in innovative, commercial, conceptual and highly individual prints for the fashion and interior industries. Printlab also offers consultancy services, whereby current trends are interpreted and suggestions for commercial print solutions are provided.
Printlab Studio Torrent
Printlab was founded in 1999 and is situated in Copenhagen's northern 'garment district', Nørrebro.
Printlab Studio Torrent
Print Lab Studio Login
Click here formore about Printlab..
0 notes
Text
Array no PHP Aprenda como criar e iterar
Array no PHP Aprenda como criar e iterar
Array no PHP Aprenda como criar e iterar com foreach e while
Array no PHP aprenda como criar e iterar, pois array é uma estrutura que relaciona valores e chaves, é uma lista de valores armazenados na memória.
Um array em PHP é equivalente ao conceito de vetor normalmente ensinado nas faculdades. Outro conceito que se asemelha é o conceito de matriz, equivale a um array multidimensional (um array…
View On WordPress
#array#array php#array php 7#array php add first#array php add item#array php ajax#array php foreach#array php functions#array php insert#array php to javascript#array_push php#PHP#programação
0 notes
Photo

17 Stunning Ionic App Templates and Ionic Themes
In this post, I'll show you 17 of the best Ionic app themes and templates on the market—including 4 free Ionic app design templates.`
What is Ionic?
Ionic is a popular framework for creating hybrid mobile applications using the wildly popular Angular framework.
Do you want to create hybrid apps that work on both Android and iOS? With Ionic, you no longer need to create separate apps for Android and iOS operating systems. Instead, with Ionic, you can create one code base that is compatible with both Android and iOS.
One great benefit of using Ionic is that you don't need to learn a new language from scratch. Developers can create full-featured mobile apps for Android and iOS using technologies they are already familiar with like JavaScript, HTML, and CSS.
Top-Selling Ionic App Templates on CodeCanyon
Ready to kick-start your Ionic development? Try out one of these ready-made app templates from CodeCanyon, for Ionic 4 and beyond!
These app templates and themes start from prices as low as $5 for something simple like a lockscreen. However, you can also find templates to create full-fledged dating apps, food delivery apps, and more.
Best Ionic App Templates and Ionic Themes for 2020
1. Bestselling: Ionic eCommerce
Ionic eCommerce offers an impressive variety of ready-made eCommerce pages so that you can create a mobile app to suit your needs. It also provides a comprehensive CMS so that you can manage your store.
Some key features include:
interactive themes
social share
product filters, sorting, and search
inventory management
multiple payment methods including PayPal, Instamojo, and Hyperpay
supports multiple languages
push notifications
The developer provides full support and will customize and install the app for you for a fee.
2. Bestselling: Ionic 3 App for WooCommerce
Ionic 3 App for WooCommerce is an app template you should definitely consider using if you are creating a shopping app. It allows you to quickly create a beautiful app that can connect to your WooCommerce website, pull data and settings from it, and sync categories and products in real time. It also promises your customers an easy and hassle-free shopping experience.
Customers can also search products within categories, view order history, and add products to a wish list.
The app template supports most of the payment methods out there, automatically loads shipping methods, allows customers to search for products globally on the home page or within categories, and much more.
Other notable features of this template include:
ability to load content from local storage
powerful admin panel where you can load the designs you like
unlimited design layout
3. Trending: Grocery Ionic
Grocery Ionic will help your grocery store improve the lives of your customers. It converts your grocery store into an online store and it comes with a powerful back-end CMS to help you manage it.
It has a great UI where can you list all your items together with their descriptions. Customers can browse and add the items they want to the shopping cart, place an order, and securely pay for it. You can then deliver their items directly to their door steps. Payment gateways include: Paypal, Stripe, Razor.
The following back-end features will help you understand the scope of this app:
Inventory management helps you create, update, and delete Items.
Orders management allows you to view orders, change status, ready for delivery.
Slider management makes it easy to add new slider images.
Category management for creating unlimited categories and products.
View feedback from customers.
Receive and answer customer queries.
Google Maps integration lets delivery find customer locations.
4. Trending: Food Delivery App with PWA and Firebase
When you purchase the Ionic 5 Food Delivery app Template, you will receive an admin panel and three main apps: the user app, restaurant app, and delivery app.
The app supports multiple restaurants, multiple cities, multiple languages and multiple payment gateways. It also comes with comprehensive documentation including video installations guides.
More features of this awesome app template include:
addresses from geo-location
live location tracking
push notification with custom alert
admin invoice generator
reviews for restaurants, food, and drivers
5. Business Directory Ionic 5
Consider Business Directory Ionic 5 if your goal is to build a mobile app which lists businesses with their products and services. This complete store and business listing solution consists of a mobile application and a powerful content back-end with data updates.
No coding knowledge is required to set up the app. It is easy to customize and comes with curated color themes.
Through the clean and user-friendly interface, users can easily browse through businesses and stores using various filters such as category, name or distance.
Store and business owners can display and promote their products, services, news, contact information and more.
Finally, free updates with new features are added constantly.
6. Conference Ionic 5
Conference Ionic 5 is the ultimate tool to provide mobile access to complete information about a conference to enhance the attendee experience and boost the conference marketing.
Conference Ionic allows user to view schedules and conference information such as location, exhibition halls, sponsors. Committees have contact with organizers and other attendees.
Users can create their personal agenda for an easier attendance and access speaker profile and event information.
7. Giraffy Delivery
Giraffy Delivery is a complete food delivery platform, with both iOS and Android mobile app templates. It also offers fully customizable templates so you can put your vision into reality.
Some of the notable features include:
multiple languages
loyalty program
sales report dashboard
push notifications
multiple payment gateways
The template also comes with a very easy-to-use Laravel admin back-end where you can manage products, orders, customers, and vendors.
8. Nearme
Nearme is a location-based app template that has definitely had some teething problems in the past. However, with the recent Ionic 5 update, improved documentation, and a beautiful redesign, it's earned a place on our list as a great template to help developers build an app that will identify supermarkets, restaurants, places of interest, gas stations, and so on that are near the end user.
The template comes with an admin panel that allows developers to send push notifications to users and manage categories, places, deals, slider images, users, reviews, and more.
9. Ionic Stencil Essential
The Ionic Stencil Essential app template gives you a UI kit to quickly create Ionic 3 and Ionic 4 apps. You will get two separate code bases. One is based on Ionic 3, while the other one is based on Ionic 4.
Apps you can build include event organizer apps, calendar apps, eCommerce apps, or other apps related to business and finance. There are a lot of screens and UI elements available to cover all your needs.
Here are some of its features:
multiple themes available for use
clean user interface
easy to install with detailed documentation
codebase is compatible with both iOS and Android
regular updates with new features
10. Food Delivery App Ionic 5
Food Delivery App is a food, grocery, and delivery app that comes with a highly attractive UI that has three sections—user, restaurant, and delivery.
Users can utilize search features to find restaurants they want to order from, whether they want delivery or pickup, receive notification on the status of their orders using SMS. They have access to multiple payment gateways including the ability to make offline payments.
Admins can import and export menus from Excel. They can add or edit orders and set commissions for restaurants.
The delivery section comes with features that include: live order tracking, geolocation maps, push notification for order status changes, and offline payment options like cash on delivery.
11. Deco News
The Deco News Ionic app template is the ready-made solution you need to build your own news app. News apps give content users access to issues they care about under one platform.
Deco News app template comes with a wide array of cutting- edge features that include:
12 color combinations
Admob integration
deep linking
push notifications supported by OneSignal
forms validator
free updates and support
12. IMABuildeRz v3 Universal AppBuilder for Ionic v5
IMABuildeRz v3 is not a template, it is an app generator. It is used to generate Ionic Framework code for apps. With it, you can create no-limit apps, complete with a back-end.
The code you generate is based on your instructions and on your brand.
The generated TypeScript, PHP, HTML, and SCSS code can then be edited again for complete customization.
IMABuildeRz V3 comes with add-ons feature that allow you to create apps with or without coding skills.
13. Ionic 3 Ready-to-Use Elements with 12+ Categories
This Ionic theme will help you get started quickly with almost any kind of app that you plan to create using Ionic.
Instead of a single app dedicated to creating something specific like food delivery, restaurant or dating applications, this Ionic theme comes with different individual components that you can use in your own apps.
There are currently 12 different components to display chats, addresses, profile, home feed, and orders, as well as login and registration. Each of these components has multiple variants for the UI. For example, there are five different UI demos for the grid component. You can pick the one that meets your needs and easily integrate it in your application.
The UI looks great for each component, and the code has been optimized to give you the best possible performance, without any lag.
Free Ionic App Templates and Components
It is not always possible to find completely developed Ionic app templates for free. Most of the time, you can expect to get individual components for free like login screens, or custom lists. Here are a few listing a few free Ionic app components and templates.
Ionic 4 Custom Color Picker
This component will help you quickly add a custom color picker to your Ionic app. Instructions for installation and usage are given on the download page.
Ionic 4 Starter Theme
This is a basic Ionic 4 starter theme with several pages like login, register, about, and edit profile. It also contains a couple of components like notifications and popup menu.
Beautiful Custom List
This beautiful custom list is actually a standalone component that you can integrate in your other Ionic apps. As the name suggests, it is simply a list of different items. However, the UI is very appealing.
Ionic 3 Multi Purpose Theme
This is yet another basic Ionic 3 theme that gives you access to common ready-made components and pages. You will get things like a welcome page, a news feed page, and a sidebar with sliding animation.
Tips on Getting Started With an Ionic App
Even though Ionic makes it a lot easier for people to quickly create apps for both Android and iOS, it can still be a bit challenging for absolute beginners. There are a couple of things that you can do to get started quickly.
1. Read the Documentation
The best way to learn about Ionic and get help when you are stuck is to read the documentation. It provides information about a variety of topics like installation, theming, components, and native APIs.
2. Try Creating Basic Apps
The next step in the right direction would be for you to try to create some basic apps of your own. This could be something simple like a timer or calendar app in the beginning. After that, take a look at free apps created by other users and see the process they followed.
3. Start Developing Complete Apps
Once you fully understand the basic concepts and have created a few basic apps, it's time to start working on the app you wanted to create in the first place.
Build Your Ionic App Now!
A fully completed app will have a lot of components, screens, and functionality that will take a lot of time and effort on your part to create from scratch. The Ionic apps and templates available on CodeCanyon will prove a great time-saver for you at this point.
Take Advantage of Ionic Tutorials from Envato Tuts+
If you want to improve your skills in building Ionic apps and templates, then check out some of the ever-so-useful Ionic tutorials we have on offer!
How to Learn Ionic: Start With These Courses and Tutorials
New to Ionic? Or just not sure where to look next? This article provides a walkthrough of resources available to help you take your Ionic to the next level!
Kyle Sloka-Frey
03 Oct 2019
Ionic
Ionic From Scratch: Getting Started With Ionic
So you've heard about Ionic and you're wondering how to get started? Learn how to set up an Ionic development environment and create an Ionic project.
Tinashe Munyaka
20 Nov 2017
Ionic
Top 4 Ionic App Builders and Universal Ionic Templates
Looking to build a complex app for native mobile devices? These extensions for the Ionic App Builder and Universal App Templates will help to close the gap...
Kyle Sloka-Frey
28 May 2019
Ionic
Easier Apps With Ionic Templates, Frameworks, and Tools
Looking to create an app in Ionic, but aren't sure how to get started? Here we talk about Ionic templates and tools that are available to help get your app...
Kyle Sloka-Frey
13 Jun 2019
Ionic
11 Best Ionic App Templates
What if you could create your clients' apps faster, without having to code from scratch? It's possible with Ionic app templates. App templates provide you...
Esther Vaati
05 Mar 2020
Ionic
The Best Ionic App Templates
Looking to build a cross-platform native app? These Ionic templates will make sure that your project gets started on the right foot.
Kyle Sloka-Frey
28 Feb 2020
App Templates
by Franc Lucas via Envato Tuts+ Code https://ift.tt/3h9X0NO
0 notes
Text
Basic Information About C Language [Updated]

Do you want to learn basic information about the c Language?
Yes!
That’s great.
This article is the right choice for you.
Here, I will provide you all the basic information about C language.
Introduction Of C Language
C is a high-level computer programming language.
Usually, this language is designed to be compiled with a relatively simple compiler.
It provides low-level access to memory.
So, it requires minimum runtime support to process instructions.
It is also known as:
Mother programming language
System programming language
Mid-level programming language
Procedure-oriented programming language
Structured programming language
If you learn this language, another programming language is easy to understand for you.
History Of C Language
It is interesting to know the history of the C language.
Here, I discuss a brief history of the c language.

It was originally invented by Dennis Ritchie in 1972 at AT & T’s Bell Laboratory in the USA.
It was primarily developed to writing UNIX operating system.
Gradually, it becomes a very popular programming language in the worldwide.
It has been standardized by the American National Standards Institute (ANSI) since 1989 and subsequently by the International Organization for Standardization (ISO).
Timeline of C language development
Version NameYearDeveloperC1972Dennis RitchieK&R C1978Brian Kernighan & Dennis RitchieANSI C1989ANSI CommitteeISO C1990ISO CommitteeC991999Standardization CommitteeC112011Standardization CommitteeC182017/2018Standardization Committee
Features Of C Language
There are different types of features are available in the C language.
All the features are not possible to mention in one article.
Although, some of the key features are mentioned here:
Fast and Efficient
Easy to Extend
Procedural Language
Simple and clean style
Middle-Level Language
Low-level access to memory
Libraries with rich Functions
Rich set of built-in Operators
A simple set of keywords
Support memory management

These features make C language suitable for system programs like an operating system or compiler development.
Later programming languages have borrowed syntaxes and features directly or indirectly from C language.
Java, PHP, JavaScript, and many other programming languages are mainly based on C language.
Note: C++ is almost a superset of C (very few programs can be compiled with C, but not with C++).
Data Types
Each variable contains a specific data type.
Data types are used to define the data storage format.
Each data type requires different amounts of memory space and has some specific features.
There are mainly 4 data types that are mostly used in c programming.
Those are described here.
int: It is used to store an integer type value (numbers).
char: It stores a single character (alphabets).
float: It is used to store decimal numbers (floating-point value) with single precision.
double: It is also used to store decimal numbers (floating-point value) with double precision.
An int is signed by default.
It means it can represent both positive and negative values.
On the other hand, an unsigned int can never be negative.
All data types are listed here.
Data TypeMemory (Bytes)RangeFormat specifiershort int2-32768 to 32767%hdunsigned short int20 to 65535%huunsigned int40 to 4294967295%uint4-2147483648 to 2147483647%dlong int8-2147483648 to 2147483647%ldunsigned long int80 to 4294967295%lulong long int8-(2^63) to (2^63)-1%lldunsigned long long int80 to 18446744073709551615%llusigned char1-128 to 127%cunsigned char10 to 255%cfloat4%fdouble8%lflong double16%Lf
You can also use the sizeof() operator to check the size of any variable.
Variables
A variable is a simple word or letter that allocates some space in memory.
Basically, a variable used to store some different types of data.
Different types of variables require different amounts of memory and have some specific set of operations that can be applied to them.
/* example of declaring variable*/int a; //Here a is integer type variablechar b; // Here b is character type variablefloat c; // Here c is float type variable
Rules For Defining Variables
A variable can have any alphabet, digit, and underscore.
A variable name must start only with the alphabet, and underscore. It can’t start with a digit.
No space is allowed within the variable name.
A variable name can not be any reserved word or keyword. (e.g. int, void, etc.)
Arrays
An array is a data structure that contains the same types of data items.
A variable can carry only one data item at a time.
If you want to store multiple data items in a data type, you need to use an array.
You can not initialize an array with more elements than the specified size.
The specified size is declared to the left of the variable between the third brackets.
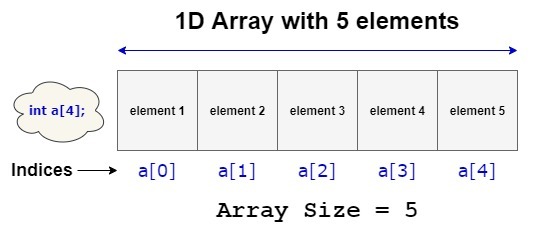
A one-dimensional array is like a row list.
On the other hand, a two-dimensional (2D) array is like a table.
Arrays consist of contiguous memory locations.
Array Declaration
1. Array declaration by specifying the size
int a[5];
2. Array declaration by initializing the elements
int a[] = { 10, 20, 30, 40 };
3. Array declaration by specifying the size and initializing the elements
int arr[5] = { 10, 20, 30, 40 };
Note: You can use While or For loops to add values in the variables.
Pointers
A pointer is a variable that stores the address of another variable.
For example, an integer variable stores an integer value, however an integer pointer stores the address of an integer variable.
We use the unary operator & (ampersand) that returns the address of a variable.
#include <stdio.h> int main() { int x; printf("%p", &x); return 0; }
Here, &x print the address of variable x.
Keywords
Keywords are specific reserved words in C which attached with a specific feature.
The list of keywords includes almost all the words that can help us to use the functionality of the C language.
C does not contain very large number of keywords.
However, there are 32 keywords are available in C98 language.
autobreakcasecharconstcontinuedefaultdodoubleelseenumexternfloatforgotoifintlongregisterreturnshortsignedsizeofstaticstructswitchtypedefunionunsignedvoidvolatilewhile
C99 reserved five more keywords.
_Bool_Imaginaryrestrict_Complexinline
C11 reserved seven more keywords.
_Alignas_Atomic_Noreturn_Thread_local_Alignof_Generic_Static_assert
Most of the recently reserved words begin with an underscore followed by a capital letter.
Because identifiers of that form were previously reserved by the C standard for use only by implementations.
Operators
C supports a rich set of operators, which are different types of symbols.
Each operator performs a specific operation with a variable.
All operators are listed in the following table.
Operator NameOperator SymbolArithmetic+, -, *, /, %assignment=augmented assignment+=, -=, *=, /=, %=, &=, |=, ^=, <<=, >>=bitwise logic~, &, |, ^bitwise shifts<<, >>boolean logic!, &&, ||conditional evaluation? :equality testing==, !=calling functions( )increment and decrement++, —member selection., ->object sizesizeoforder relations<, <=, >, >=reference and dereference&, *, [ ]sequencing,subexpression grouping( )type conversion(typename)
These operators tell the compiler to perform specific mathematical or logical operations.
Memory Management
The most important function of a programming language is to provide facilities for managing memory and objects that are stored in memory.
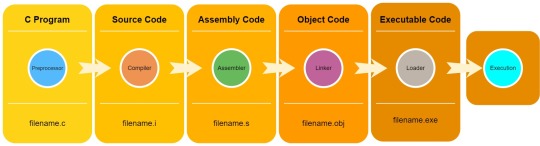
C language provides 3 unique ways to allocate memory for objects.
Static Memory Allocation
This is an allocation technique that allocates a fixed amount of memory during compile time.
Dynamic Memory Allocation
This is also an allocation technique that manages system memory at runtime.
Automatic Memory Allocation
When you declare an automatic variable (such as a function argument or a local variable), then it happens.
Libraries
Library functions are inbuilt functions in C language that are grouped together in common files. This file is called the C standard library.
Each library provides specific functions to perform specific operations.
We can use these library functions to get the pre-defined output instead of writing your own huge complex code to get those outputs.
All C standard library functions are declared in header files which are saved as filename.h.
We are including the library in the header files in our C program.
#include<filename.h>
The command allow to use of the functions that are declared in the header files.
Basic Structure Of C Program
A set of rules is defined for the C programs that are called protocols.
The protocols help us to design the basic structure of a program.
Here, I mentioned the basic structure of a C program.
Documentation section
Link section
Definition section
Global declaration section
Main function section
Sub-program section
All C programmers must follow the protocols when writing any program.
Let’s discuss all the basic structure sections of a C program.
Documentation Section
The documentation section is a part of the program where the programmers provide the details about the program.
In this section programmers usually give the name of the program and the details related to the program.
This code gives an overview of the program.
//program name/*This is aC Program*/
Link Section
This section is used to declare all the header files that will be used in the program.
It tells the compiler to link the header files to the system library.
#include<stdio.h>
Definition Section
In this section, we can define different types of constants.
The keyword define is used to define a constant value in this part.
#define PI=3.14
Global Declaration Section
All the global variables are declared in this section.
User-defined functions are also declared in this section of the code.
int a,b,c;
Main Function Section
Every C-programs must have the main function.
The main function contains 2 parts.
1. Declaration Part: All the variables are declared in this part.
2. Execution Part: This part starts with the curly brackets and ends with the curly close bracket.
Both the declaration and the execution part are writing inside the curly braces.
int main(){int a=5;printf(" %d", a);return 0;}
Sub-program Section
All user-defined functions are defined in this section.
int add(int a, int b){return a+b;}

Hello World C Program
This is the source code of a basic “Hello World” Program.
#include<stdio.h>int main(){/*First basic C Program*/printf("Hello World.");getch();return 0;}
After compiling the source code the output will be the following:
Output:
Hello World.
Explanation of “Hello World” C Program
Here, I explained each line of the “Hello World” C program.
#include <stdio.h>
This is a preprocessor command that includes the input header file from the C library before compiling a program.
int main()
This is the main function of executing any C program begins.
{
It represents the beginning of the main program.
/*First basic C Program*/
If any words exist inside the command /* and */ in any C program that won’t be considered for compilation and execution. This is also called a comment line.
printf(“Hello World.“);
The printf command displays the words in the quote on the screen.
getch();
This function is used to hold the output screen and wait until the user gives any type of input. So that we are able to see the output on the screen.
return 0;
Here, the return is a keyword that is used to return some value from a function.
The main function returns an integer value, therefore here we are returning 0.
It means our program has been run successfully and we terminate our main function with this return statement.
}
It represents the ending of the main program.
Create a C Program
Are you want to create and execute a C programs yourself?
Then you need to follow the instructions:
At first, you need to install a C supported IDE (Integrated Development Environment) on your computer.
Once the IDE is installed on your computer, you can open and create a C program.
If you don’t want to install the IDE on your computer, you can use an online compiler or IDE.
The good thing about the online compiler is it can compile C, C++, C#, Java, and many other programming languages.
We also provide some links to the online and offline IDE in this article that can help you to create and execute your C program easily.
Best IDE For C

You can create and edit C programs with any code editor or even a general editor.
Yet, it is very important to choose the best IDE for beginners.
If the IDE is integrated with the C compiler, the process of creating and compiling the C program will be easier.
Anyway, we collect some best IDE for c program that can help you to write and execute any c program easily.
Here are some collection,
Run C Program Online
Onlinegdb IDE
Tutorialspoint IDE
Rextester IDE
Run C Program On Android Phone
TruboCdroid
Cxxdroid
TurboCPlus
CppDroid
Run C Program On Windows
Turbo C++
Dev C++
Code::Blocks IDE
Run C Program In Mac OS
Turbo C++
Code::Blocks IDE
Run C Program In Linux
Code::Blocks IDE
Choose the best IDE that makes you comfortable to create and edit the C program.
Thus, your programming skills will increase and you will be able to create any program within a few minutes.
Advantages Of C Language
It is one of the most useful programming languages when the system requires quick and direct access to the hardware.
C is the most commonly used system with limited resources (such as memory).
Where performance is the most important attribute, C is the best choice for programmers.
Disadvantages Of C Language
C does not support OOP (Object-oriented programming) concepts, that’s why C++ is developed.
There is no runtime checking ability in the C language. It only does compile-time checking.
It does not support the concept of the namespace. We cannot declare two variables of the same name without namespace.
It does not have the concept of constructor and destructor.
Uses Of C Language
There are different types of uses of C language in programming.
Some uses are the following:
C mainly used to develop system software, operating systems, BIOS, Embedded Systems, Real-time systems.
To develop application software like databases (MySQL) and 3D software (Autodesk Maya).
Used to create graphical related applications like computers and mobile games.
To evaluate any types of logical and mathematical equations using c language.
UNIX kernel is completely made in C Language.
The language is used to design different language compilers.
Conclusion
The C language doesn’t seem to have an expiration date.
It has a closeness to the hardware, great portability, and deterministic usage of resources.
For these features, it is the ideal programming language for low-level development of things like operating system kernels and embedded software.
Its good performance, efficiency, and versatility make it an excellent choice to develop highly complex data manipulation software like MySQL, 3D animation, and more.
C is still unsurpassed where performance is the main priority.
I hope now you know all the basic information about the C language.
Now it’s your turn.
What do you think about C Language?
Share your thoughts in the comment box.
Would you like a copy of the article?
Yes! Give me PDF
from Blogwaping https://www.blogwaping.com/2020/07/basic-information-about-c-language_18.html
0 notes
Link
Javascript has a number of methods related to arrays which allow programmers to perform various array operations. There are four methods which are particularly used for adding and removing elements to and from an array. They are: push(), pop(), shift() and unshift(). For an experienced as well as new programmers, its likely to sometimes get confused how each of them work and which one to use in which situation. Thus, in this article, we have tried to simplify the concept with pictures and examples. Let's start exploring them one by one. Then we will compare their similarities and differences. Please look at the pictures too for better understanding.
1. Push

As seen in the image above, the push() method adds one or more elements at the end of an array. Those element(s) are supplied as parameters while calling the method. This phenomena of putting things at the end of something(a file, an array etc.) is often called 'append' in computer world. After appending the elements(s), push() method returns the new length of the array.
// Syntax: arr.push(item1[, ...[, itemN]]) // Parameters: One or more items // Return value: the new length of array let languages = [ "Java", "PHP", "Python" ]; let foo = languages.push("JS"); console.log(foo); // Output => 4 console.log(languages); // Output => [ 'Java', 'PHP', 'Python', 'JS' ]
2. Pop

The pop() method removes the last element from an array and returns that element. This method does not take any parameter.
// Syntax: arr.pop() // Return value: the removed element of the array let languages = ["Java", "PHP", "Python"]; let poppedItem = languages.pop(); console.log(poppedItem); // Output => Python console.log(languages); // Output => [ 'Java', 'PHP' ]
3. Shift

The shift() method is similar to the pop() method. It removes the first element from an array and returns it. Just like pop() method, it does not take any parameter.
// Syntax: arr.shift() // Return value: the removed element of the array let languages = ["Java", "PHP", "Python"]; let foo = languages.shift(); console.log(foo); // Output => Java console.log(languages); // Output => [ 'PHP', 'Python' ]
4. Unshift

Just like the push() method we saw in the beginning, unshift() adds one or more elements to the array. But it adds them at the beginning of the array, which is often called as prepend in computer science. After prepending element(s), the unshift() method returns the new length value of the array.
//Syntax: arr.unshift(Item1[, ...[, ItemN]]) // Return value: the new length of the array let languages = ["Java", "PHP", "Python"]; let foo = languages.unshift("JS"); console.log(foo); // Output => 4 console.log(languages); // Output => [ 'JS', 'Java', 'PHP', 'Python' ]
By now, I am hopeful that your concepts are clear. Let us use the comparison method now which will help us summarize it understand it even better. Comparing will also help us retain the concept for longer time.
'Push and Pop' vs 'Shift and Unshift'
Push and Pop deal with end of the array while Shift and Unshift deal with beginning of the array.
Push vs Pop
Push is for adding element(s) while Pop is for removing an element. Push requires elements as parameters when being invoked while Pop does not need the same. Push returns the new length of the array while Pop returns the popped out element.
Unshift vs Shift
Unshift is for adding element(s) while Shift is for removing an element. Unshift requires elements as parameters when being invoked while Shift does not need the same. Unshift returns the new length of the array while Shift returns the removed element. I hope it helped. Let's discuss more on the comments section?
0 notes
Text
WordPress Knowledge Base & Wiki Plugin for WordPress with Frontend Submission
New Post has been published on https://intramate.com/wordpress-plugins/wordpress-knowledge-base-wiki-plugin-for-wordpress-with-frontend-submission/
WordPress Knowledge Base & Wiki Plugin for WordPress with Frontend Submission

LIVE PREVIEWGet it now for only $20
Pixel Knowledge Base is a Powerful WordPress Knowledge Base & Wiki Plugin for WordPress that comes with a huge host of well thought out essential options and possibilities.
WordPress Knowledge Base Features:
Templating system baked into the core just like WooCommerce
Restrict Knowledge Base Categories by any role
Smart Ajax Live Search
Sort by date, title, views or number or votes without refreshing the page
Unique Voting System
Localization / I8ln support
Seamless plug and play installation – no coding experience required
Custom Templates Support
Knowledge Base Categories with 1/2/3 or 4 columns Per Row and drag and drop re-order
Change the knowledge base and associated category slug in a few simple steps
Lots of public template actions for developers to create unique layouts.
Gracefully degrades so compatible with all modern browsers
Lightweight Progressive CSS that inherits your themes styles by default – just 5KB when minified!
Found a bug? World Class support included.
What Can Pixel Knowledge Base for WordPress Do?
Restrict Knowledge Base Content Based on User Roles
Are you running a membership service and only want to show certain knowledge base categories to certain users? easy!
With a few clicks of a button you can easily restrict what your members get to see by role.
Set Knowledge Base Category Colors
Admin can now set unique colors for each of your knowledge base categories!
Submit Posts from The Frontend
In version 1.2, we added the ability for knowledge base posts to be submitted from the frontend of your website.
Allow your users to submit new posts to the backend of the site while retaining the ability to control which roles can and cannot submit posts and even if they are published or set as drafts.
Ajax Powered Search
Lightening quick ajax search returns the result your user wants fast with slick CSS3 animations to wow your users.
Sort Results by Date, Views, Title and Votes Instantly!
Instantly order and sort any results with a click of the button…no page refresh needed!
Interactive Voting Experience
Our smart voting system allows the user to help your community by voting for what was helpful and what was not.
Let users rank your questions for you.
Easily Categorize Your Knowledge Base
Pixel Knowledge Base comes with categories already registered, all you need to do it activate the plugin and your set to go.
Change Log
Version 1.0.0
Pixel Knowledge Base Release
Version 1.0.1
Fixed a bug with permalinks
Version 1.1.0
Added User Role Restrictions to Categories, Children and Posts
Hidden empty categories with no posts from the sidebar widget
Added custom template actions allowing dynamic templates to be created
* BUG FIX * Fixed wrong display in breadcrumbs when knowledge base was empty
Version 1.2.0
Added user submissions from the frontnend
User can set draft or publish default post status
can restrict submissions by user role
Single shortcode to check if user can submit and output form on any page
Version 1.3.3
Admins can now assign colours to individual knowledge base categories.
Version 1.3.4
Comments have been enabled for knowledge base answers
Added Localization / Translation Support
Added Restricted Category to the Demo Website
Added a new options to allow users to display restricted categories in the sidebar regardless of wether they have the permissions to view or not.
Fixed some PHP errors where array index was not defined
Fixed CSS bug with sidebar widget borders
Version 1.3.5
New Shortcode: Users can now show items anywhere on their website
Version 1.3.6
New Widget: Show Knowledge Base Search Form in Any Widget Area
New Widget: Show Latest Items in Any Widget Area
New Widget: Show Items by Category in Any Widget Area
IMPROVEMENT New UI Changes
Version 1.4.1
Fixed a being appended to titles
Added translation file
Added new function to enable translations
New Widget: Show Latest posts or posts from a knowledge base category in any widget area
Version 1.4.2
changed Self:: selectors to lowercase
changed Parent:: selectors to lowercase
updated spelling error in core files.
Version 1.4.3
Add cleaner styles for sidebar widgets
New Widget: Show all posts in a categorised form
LIVE PREVIEWGet it now for only $20
0 notes
Text
300+ TOP Oracle Tuxedo Interview Questions and Answers
Oracle Tuxedo Interview Questions for freshers experienced :-
1. When and by whom was Oracle Tuxedo formed? Tuxedo was built by AT&T i.e. American Telephone & Telegraph Company in the 1980s. Oracle Tuxedo is a software that was developed by Oracle corporations in 2008. 2. What does Tuxedo mean to you? Well the full form of Tuxedo is Transactions for Unix , Extended for distributed operations. Simply, it is a middle ware platform which manages the distribution of computing environments along with processing of transactions. It is also a cross platform software that can be run by any operating system. 3. What is a Middleware? Technically, Middleware is a hidden layer or layers of software between Operating system and Application. It comprises of common functionalities crucial for many applications. 4. Name the languages used by Oracle Tuxedo? The software is written in 7 languages C C++ JAVA PYTHON COBOL Ruby PHP 5. What according to you is the greatest advantage of Tuxedo? The amazing clustering capability of Tuxedo is its greatest advantage. It can process millions of requests in a second. Being highly optimized it gets responses within few microseconds. 6. Which cluster is used by oracle? Oracle uses Oracle RAC or Real Application Cluster. 7. What is RAC? Oracle RAC is Oracle’s premier shared disk database clustering technology. It is a clustered database solution for scalability, high availability, flexibility and elasticity. RAC was introduced in 2001 with Oracle 9i. It is available in standard as well as enterprise edition. 8. What is difference between RAC & non RAC environment in Oracle? In case of Non RAC environment a single instance accesses a single database. The database contains control files, redo log files & database files which is physically present on desk. Whereas, The RAC environment contains two or more instances communicating with a single database ; these all are instances running on separate servers. 9. What is Oracle Exadata? Exadata is simply a data appliance. A data appliance is a server with pre-installed & pre-optimized database. Three major components of Exadata database server are DB Server , Cell Storage , Infiniband Switch , Cisco Switch , PDU , Database Instance , ASM Instance , Database Resource Manager The key Features of Oracle Exadata are Hardware level , Storage Server Cells , High Speed Infiniband Switch , Software level , Smart Scan , Flash Cache , Hybrid Columnar Compression , IORM (I/O Resource Manager). 10. How can we shift a normal database to Exadata? There are almost 9 possible ways to do that. Physical Standby Logical Standby Export/Import Transportable Tablespace Transportable Database Golden gate RMAN cold Oracle Streams Hot backup restoration

Oracle Tuxedo Interview Questions 11. What is ASM? ASM is Automatic storage management which was introduces in Oracle 10g . It provides storage solutions. It is a very powerful tool for managing multi-terabyte database. The storage components of Oracle ASM are ASM Disks ASM Disk groups ASM Allocation units ASM Extents ASM Files ASM File Extent Map ASM can add a disk from the volume or remove it, ASM can perform the load balancing inside the storage. Basically , ASM provides the volume manager layer which is essential for every software. It also acts as a file system. 12. What are the benefits of ASM? There are several benefits of ASM . The most important aspects of ASM are It stripes files rather than logical volumes It can perform Online disk reconfiguration and dynamic rebalancing It has adjustable rebalancing speed It Provides redundancy on a file basis Besides, ASM is Custer-aware and it can be automatically installed . 13. What are the temporal data types provided by Oracle? Oracle provides 3 kinds of data types- Date data type which provides different formats of dates. Timestamp data type which provides different formats of Time stamp. Interval data type which provides interval between dates & times. 14. What is SALT? SALT stands for service architecture leveraging tuxedo. It is a SOAP over https gateway. It was created to expose tuxedo services as web services which will invoke web services from within tuxedo applications using tuxedo API. SALT is configuration driven. It is scalable and highly available. Code changing is not required in case of SALT. 15. What is an Oracle instance? Oracle instance is a system global area (SGA) and the Oracle background processes constitute an Oracle database instance. Every time a database is started, a system global area is allocated and Oracle background processes are started. The SGA is deallocated when the instance shuts down. After starting an instance, Oracle associates the instance with the specified database. This is called mounting the database. The database is then ready to be opened, which makes it accessible to authorized users. 16. What is Oracle package? Oracle package is a schema object that groups logically related PL/SQL types, items, and subprograms. Packages offer several advantages: modularity, easier application design, information hiding, added functionality, and better performance 17. Explain the general concepts of PL/SQL? PL/SQL is Oracle's procedural extension to SQL. With PL/SQL, we can manipulate data with SQL statements, and control program flow with procedural constructs such as IF-THEN and LOOP. we can also declare constants and variables, define procedures and functions, use collections and object types, and trap run-time errors. Applications written using any of the Oracle programmatic interfaces can call PL/SQL stored procedures and send blocks of PL/SQL code to the server for execution. Because it runs inside the database, PL/SQL code is very efficient for data-intensive operations, and minimizes network traffic in client/server applications. 18. What is a database trigger? A database trigger is a stored procedure that Oracle invokes automatically when certain events occur, for example, when a DML operation modifies a certain table. Triggers enforce business rules, prevent incorrect values from being stored, and reduce the need to perform checking and cleanup operations in each application. Here are some important items to remember about triggers. -On insert triggers have no : OLD values. -On delete triggers have no :NEW values -Triggers do not commit transactions. If a transaction is rolled back, the data changed by the trigger is also rolled back. -Commits, rollbacks and save points are not allowed in the trigger body. A commit/rollback affects the entire transaction, it is all or none. -Unhandled exceptions in the trigger will cause a rollback of the entire transaction, not just the trigger. -If more than one trigger is defined on an event, the order in which they fire is not defined. If the triggers must fire in order, we must create one trigger that executes all the actions in the required order. -A trigger can cause other events to execute triggers. -A trigger cannot change a table that it has read from. 19. What is a data warehouse? A data warehouse is a relational database that is designed for query and analysis. It usually contains historical data derived from transaction data, but it can include data from other sources. It separates analysis workload from transaction workload and enables an organization to consolidate data from several sources. In addition to a relational database, a data warehouse environment includes an extraction, transportation, transformation, and loading (ETL) solution, an online analytical processing (OLAP) engine, client analysis tools, and other applications that manage the process of gathering data and delivering it to business users. Most data warehouses use a staging area to clean and process our operational data before We may want to customize our warehouse's architecture for different groups within our organization. 20. What is RDF? A set of rules (a sort of language) for creating descriptions of information, especially information available on the World Wide Web. RDF could be used to describe a collection of books, or artists, or a collection of web pages as in the RSS data format which uses RDF to create machine-readable summaries of web sites. RDF is also used in XPFE applications to define the relationships between different collections of elements, for example RDF could be used to define the relationship between the data in a database and the way that data is displayed to a user 21. What do the Oracle logical structures comprised of? Logical structures of an Oracle database include tablespaces, schema objects, data blocks, extents, and segments. Because the physical and logical structures are separate, the physical storage of data can be managed without affecting the access to logical storage structures. 22. Define cursor variable? A cursor variable is associated with different statements which can hold different values at run time. It is kind of reference type. 23. Describe PLS_INTEGER datatype? PLS_INTEGER and BINARY_INTEGER are identical datatypes and are only available in PL/SQL. You cannot create a column in a table with either of these data types. PLS_INTEGER is a highly efficient integer 32-bit data type. You will most commonly see PLS_INETGER (and BINARY_INETGER) in PL/SQL routines as an index variable. An associative array (INDEX BY TABLE) index. Both PLS_INTEGER and BINARY_INTEGER allow whole numbers only. Decimal fractions are rounded to the nearest whole number. 24. What is a pragma? Pragma is a keyword in Oracle PL/SQL that is used to provide an instruction to the compiler like PRAGMA AUTONOMOUS_TRANSACTION. 25. What is Oracle package? A schema object that groups logically related PL/SQL types, items, and subprograms. Packages offer several advantages: modularity, easier application design, information hiding, added functionality, and better performance. 26. What is partitioning? Partitioning is a method of splitting large tables and indexes into smaller, more manageable pieces. 27. What is the DCL & DDL language ? DCL is Data Control Language statements (GRANT, COMMIT) DDL (Data D DDL language definition Language) statements are used to define the database structure or schema (CREATE, ALTER, TRUNCATE). 28. What is EXPLANE PLAN? The EXPLAIN PLAN statement displays execution plans chosen by the Oracle optimizer for SELECT, UPDATE, INSERT, and DELETE statements. A statement's execution plan is the sequence of operations Oracle performs to run the statement. The row source tree is the core of the execution plan. It shows the following information: -An ordering of the tables referenced by the statement -An access method for each table mentioned in the statement -A join method for tables affected by join operations in the statement -Data operations like filter, sort, or aggregation In addition to the row source tree, the plan table contains information about the following: -Optimization, such as the cost and cardinality of each operation -Partitioning, such as the set of accessed partitions -Parallel execution, such as the distribution method of join inputs The EXPLAIN PLAN results let us determine whether the optimizer selects a particular execution plan, such as, nested loops join. 29. What is ERP System? Enterprise Resource Planning, a system that is used to manage all aspects of a company's operations. ERP is a way to integrate the data and processes of an organization into one single system. 30. What does TUXEDO mean? Transactions for UniX, Enhanced for Distributed Operation 31. Which companies owned TUXEDO before BEA? AT&T, USL, Novell. 32. What's the TUXEDO 'buddy' mechanism? The DBBL keeps the BBL up, the BBL keeps the DBBL (and all other servers) up. Oracle Tuxedo Questions and Answers Pdf Download Read the full article
0 notes
Text
Display data in the table, JSON or CSV format with WP CLI Formatter
From the last few articles, we are familiar with the WP CLI command.
In this article let’s learn about how to display custom data in the table, JSON or CSV format.
Note: If you read some recent articles then you can skip some below steps that are related to plugin creation.
Create Empty Plugin #Create Empty Plugin
Create a new folder wordpress-examples into plugins directory /wp-content/plugins/
Create a file wordpress-examples.php and add the below code into it.
<?php /** Plugin Name: WordPress Examples */
Note: If you want to add some additional information then you can get it from gist snippet – WordPress Complete Plugin Readme File.
Now you can see our WordPress Examples plugin exists into the plugins list.
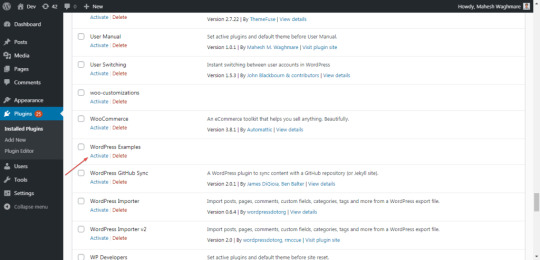
Now, Activate the WordPress Examples plugin.
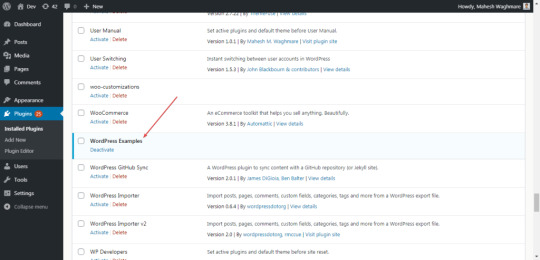
Register WP CLI Command #Register WP CLI Command
Register PHP class WordPress_Examples_WP_CLI e.g.
if ( ! class_exists( 'WordPress_Examples_WP_CLI' ) && class_exists( 'WP_CLI_Command' ) ) : class WordPress_Examples_WP_CLI extends WP_CLI_Command { } endif;
Here,
We have registered a new class WordPress_Examples_WP_CLI and extend it with WP_CLI_Command.
Add Examples Command #Add Examples Command
Now let’s register the examples. E.g.
WP_CLI::add_command( 'examples', 'WordPress_Examples_WP_CLI' );
Here,
We have used the function WP_CLI::add_command() to register our examples command.
The function WP_CLI::add_command() accepts 2 parameters. The first parameter is the command name. Which is examples in our case.
And second is a callback class which is WordPress_Examples_WP_CLI.
Add list sub command #Add list sub command
public function list( $args, $assoc_args ) { WP_CLI::line( 'Hello' ); }
Here,
We have added a function list() with two parameters.
$args contain the arguments.
$assoc_args contain the associate arguments.
Testing the Command #Testing the Command
Open command prompt/terminal. Go to your WordPress setup. I have set up WordPress in D:\xampp\htdocs\dev.test
So, Execute the below commands:
cd D:\xampp\htdocs\dev.test
wp examples list
You can see the output something like below:
λ wp examples list Hello
This command just shows the string Hello.
For testing, let’s create a static array which have some dummy data.
public function list( $args, $assoc_args ) { $list = array( array( 'id' => '1', 'first' => 'Mahesh', 'last' => 'Waghmare', ), array( 'id' => '2', 'first' => 'Swapnil', 'last' => 'Dhanrale', ), array( 'id' => '3', 'first' => 'Madhav', 'last' => 'Shikhare', ), ); WP_CLI::line( print_r( $list ) ); }
Let’s execute the command wp examples list.
λ wp examples list Array ( [0] => Array ( [id] => 1 [first] => Mahesh [last] => Waghmare ) [1] => Array ( [id] => 2 [first] => Swapnil [last] => Dhanrale ) [2] => Array ( [id] => 3 [first] => Madhav [last] => Shikhare ) ) 1
Here, we have just print the array with WP_CLI::line( print_r( $list ) );.
Now, Let’s display this array data in a well-formatted order.
Using \WP_CLI\Formatter() #Using \WP_CLI\Formatter()
We are using the in-build WP CLI helper class \WP_CLI\Formatter() to format our array in table format.
Let’s use the Formatter class into our code:
public function list( $args, $assoc_args ) { $list = array( array( 'id' => '1', 'first' => 'Mahesh', 'last' => 'Waghmare', ), array( 'id' => '2', 'first' => 'Swapnil', 'last' => 'Dhanrale', ), array( 'id' => '3', 'first' => 'Madhav', 'last' => 'Shikhare', ), ); $formatter = new \WP_CLI\Formatter( $assoc_args, array( 'id', 'first', 'last', )); $formatter->display_items( $list ); }
Here,
$formatter We have created a variable which stores the instance of the class new \WP_CLI\Formatter().
new \WP_CLI\Formatter class initialized bypassing 2 values.
$assoc_args – which contain the associated arguments.
array( 'id', 'first', 'last') – It contains the keys of our array. We will check some examples below to understand why it was passed.
$formatter->display_items( $list ); – We have called the display_items() method of Formatter class and pass the $list into it.
Let’s try some commands to see how it works.
wp examples list
After executing above command we see the output like:
λ wp examples list +----+---------+----------+ | id | first | last | +----+---------+----------+ | 1 | Mahesh | Waghmare | | 2 | Swapnil | Dhanrale | | 3 | Madhav | Shikhare | +----+---------+----------+
Hurray! Our array is displayed in the table format. Because of by default class \WP_CLI\Formatter() display items in Table format.
If we want to see the same data in another format then we need to set associate argument --format
Using –format #Using –format
Let’s try another example with --format associate argument.
Example 1
wp examples list --format=json
After executing above command we can see the result something like below:
λ wp examples list --format=json [{"id":"1","first":"Mahesh","last":"Waghmare"},{"id":"2","first":"Swapnil","last":"Dhanrale"},{"id":"3","first":"Madhav","last":"Shikhare"}]
Here, We have passed the --format=json for that, the data is display as JSON.
Example 2
wp examples list --format=csv
After executing above command we can see the result something like below:
λ wp examples list --format=csv id,first,last 1,Mahesh,Waghmare 2,Swapnil,Dhanrale 3,Madhav,Shikhare
In the --format associate argument we can pass values ‘table‘, ‘json‘, ‘csv‘, ‘yaml‘, ‘ids‘ and ‘count‘.
Try some other format yourself and understand how it displays it.
Using –field #Using –field
In our example, we have 3 keys those are id, first and last.
Let’s assume that we have 15+ keys. So, when we execute our list command then all the data will be display.
Maybe we just want to display a single column.
With the --field the associate argument we can display only specific column data.
Example 1
wp examples list --field=id
After executing above command we can see the result something like below:
λ wp examples list --field=id 1 2 3 D:\xampp\htdocs\dev.test
Here, Only Id’s column is visible for us.
Example 2
wp examples list --field=id --format=json
We have used --field=id and --format=json. Let’s see what it display.
λ wp examples list --field=id --format=json ["1","2","3"]
Example 3
wp examples list --field=ID
The output of the above command is below:
D:\xampp\htdocs\dev.test λ wp examples list --field=ID Error: Invalid field: ID.
Aah! Why it display the error? Because the value of the field is case sensitive. So all the below values considered as different:
--field=ID
--field=Id
--field=iD
--field=id
Using –fields #Using –fields
Same as --field the argument we can use --fields.
The only difference is that we can pass multiple arguments into it.
Let’s try some examples.
Example 1
wp examples list --fields=id,first
λ wp examples list --fields=id,first +----+---------+ | id | first | +----+---------+ | 1 | Mahesh | | 2 | Swapnil | | 3 | Madhav | +----+---------+
Here, We can see only the id and the first column.
Example 2
wp examples list --fields=first,id
Let’s try to change the sequence of the keys by passing values first and then id.
λ wp examples list --fields=first,id +---------+----+ | first | id | +---------+----+ | Mahesh | 1 | | Swapnil | 2 | | Madhav | 3 | +---------+----+
Interesting right! Let’s get the first and last column in JSON format.
Example 3
wp examples list --fields=first,last --format=json
Here, we have passed the --fields=first,last and --format=json.
The output is as below:
λ wp examples list --fields=first,last --format=json [{"first":"Mahesh","last":"Waghmare"},{"first":"Swapnil","last":"Dhanrale"},{"first":"Madhav","last":"Shikhare"}]
Showing data in the table, JSON or CSV format in WP CLI program!
Tweet
from WordPress http://bit.ly/2qRu6NC via IFTTT
0 notes